Mobile workforce configuration
LIDS Extensions
mobile-workforce.xml
- Standard LAS xml extension
- Derived from mobile.xml
- Defines:
- map layers (as in mobile.xml) – optional
- feature presentation (as in mobile.xml)
- screens - main menu definition with screen contents
- browses - list of features for screens
- work orders - work order definitions
- allocations – allocation definition
- offline workflow definition – optional
- other configuration…
Definitions
It is necessary to define the entities to be retrieved by the mobile client in order to continue working with them. First of all, we define the group of entities that the mobile client should target in model.xml.
        <ber:featureType id="ft_woAllocation" name="Work Order Allocation" parentId="ft_5000002">
            <ber:container refId="ct_woAllocation"/>
            <ber:groupsArray>
                <ber:group id="mobileWorkForce"/>
            </ber:groupsArray>
Then we define the groups of entities that the mobile client should retrieve for its work.
        <ber:groupArray>
            <group key="businessMetaGroup" value="mobileWorkForce"/>
        </ber:groupArray>
Each featute type that we want to use in the mobile application must be defined.
Specifically, we are talking about the feature types work order, allocation and user.
        <ber:allocationArray>
            <ber:allocation>
                <ber:featureTypeArray>
                    <ber:featureType xlink:href="model.xml#ft_woAllocation"/>
                </ber:featureTypeArray>
                <ber:attributeArray>
                    <ber:attribute id="alStartDate" xlink:href="model.xml#at_woAllocation_dateFrom"/>
                    <ber:attribute id="alEndDate" xlink:href="model.xml#at_woAllocation_dateTo"/>
                    <ber:attribute id="alWorkOrder" xlink:href="model.xml#at_woAlloc_fr_boWorkRealiz"/>
                </ber:attributeArray>
            </ber:allocation>
        </ber:allocationArray>
        <ber:workOrderArray>
            <ber:workOrder>
                <ber:featureTypeArray>
                    <ber:featureType xlink:href="model.xml#ft_boWorkOrder"/>
                </ber:featureTypeArray>
                <ber:attributeArray>
                    <ber:attribute id="woPriority" xlink:href="model.xml#at_boWorkRealiz_cl_boWRPriority"/>
                    <ber:attribute id="woEstimation" xlink:href="model.xml#at_boWorkRealiz_estimation"/>
                    <ber:attribute id="woStartDate" xlink:href="model.xml#at_boWorkRealiz_realStartDate"/>
                    <ber:attribute id="woEndDate" xlink:href="model.xml#at_boWorkRealiz_realEndDate"/>
                    <ber:attribute id="woLocation" xlink:href="model.xml#at_boWorkRealiz_address"/>
                    <ber:attribute id="woEditable" xlink:href="model.xml#at_boWorkRealiz_is_completed">
                        <ber:values editable="1"/>
                    </ber:attribute>
                </ber:attributeArray>
            </ber:workOrder>
        </ber:workOrderArray>
        <ber:user>
            <ber:featureType xlink:href="model.xml#ft_employee"/>
            <ber:attributeArray>
                <ber:attribute id="userId" xlink:href="model.xml#at_employee__userIdProperty"/>
            </ber:attributeArray>
        </ber:user>
Metadata validation through LAS Administration Console among with LIDS Metadata reference documentation is currently under developement.
light-forms.xml
-
Standard LAS xml extension
-
New general definition of feature type forms (including protocol forms) for:
- LIDS mobile app
- Mobile Workforce app
- Dynamic app – future plans
-
Light form can be defined for every FT in the model (asset, business entity, protocol, …)
Light form components
tab control
- Form can be composed of several tables, which will form sections that can be switched between the mobile client. Each such table has its own screen. We use the
<ber:tab> </ber:tab>tags for this division.
        <ber:tab label="Page #1">
        //page content
        </ber:tab>
        <ber:tab label="Page #2">
        //page content
        </ber:tab>
attributeInput
- Main element used not only for displaying or editing attributes, but it can also be used when creating a new entity and inserting necessary data.
- We can use the single-line notation in case we don't want to enrich this setup in any way by editing with conditions or view types. In single-line notation, we can use settings like readOnly, mandatory or label in case of renaming a description.
        <ber:attributeInput readOnly="true" xlink:href="model.xml#at_profile_username"/>
        <ber:attributeInput mandatory="true" xlink:href="model.xml#at_profile_pswd" label="Insert new password"/>
- It is also possible to insert other settings into the input component. For the example for the codelists we will use radioButton. Furthermore, we can insert a condition for displaying annotation or affect the visibility of an element based on the selected value of another element in the form.
        <ber:attributeInput xlink:href="model.xml#at_profile_cl_type">
            <ber:radioButtonEditor/>
        </ber:attributeInput>
        //subType will show only when first option of type is chosen
        <ber:attributeInput xlink:href="model.xml#at_profile_cl_subType">
            <ber:visibility visible="true">
                <ber:condition>'at_profile_cl_type' = 0</ber:condition>
            </ber:visibility>
        </ber:attributeInput>
- For input that contains only two states (true/false) we use the settings for checkbox. For this use, it is necessary to create a codelist in model.xml with the
<ber:checkboxed>tag. In the example below, you can also see the use of the defaultValue option.
    //Required settings for codelist in model.xml
        <ber:checkboxed pkOn="1" pkOff="0"/>
    //Inpout with only two states (true/false) in mobile client
    //Mandatory setting removes null from a selection
        <ber:attributeInput mandatory="true" xlink:href="model.xml#at_profile_public">
            <ber:defaultValue>0</ber:defaultValue>
        </ber:attributeInput>
- Creating new protocols requires not only calling the function but also which feature type is involved and which form to use to populate the data. The other optional parameters are input, which has the copying of attributes defined in it based on the build in protocols.xml, and singleInstance, which checks if a protocol on this entity and with a link to the current work order is already in existence.
        <ber:script>
            <ber:function id="createProtocol"/>
            <ber:parameterArray>
                <ber:parameter name="featureType" value="ft_protocol"/>
                <ber:parameter name="form" value="fd_fillProtocol"/> //value si ID of form defined in light-form.xml
                <ber:parameter name="input" value="copyValues"/> //optional, value si ID of protocolInput rules defined in protocols.xml
                <ber:parameter name="singleInstance" value="true"/> //optional, default value si false
            </ber:parameterArray>
        </ber:script>
- Browsetool is a function that adds a button to the view that allows us to trigger a defined action. So we can modify an attribute of an entity or create a new bound element.
        <ber:browseTool name="Publish">
            <ber:script>
                <ber:function id="changeFeatureAttribute"/>
                <ber:parameterArray>
                    <ber:parameter name="targetAttributeId" value="at_profile_public"/>
                    <ber:parameter name="targetValue" value="1"/>
                </ber:parameterArray>
            </ber:script>
        </ber:browseTool>
stepper, attribute inputs, relation browses, attachments, combo boxes, check boxes, radio buttons, inline codelists, annotations, signature, business workflow, toolbars, protocols
Metadata validation through LAS Administration Console is supported. Documentation is also available in LIDS metadata reference.
model.xml
- Standard LAS xml extension
- Defines:
- forms
- mobileSimple
- mobileFull
- featureInfo
forms
- There are defined forms which are used for editing or details. The label of form is inserted into
<ber:caption label=""/>and attribudes which are shown in the form are inserted into<ber:field refId=""/>.
    <ber:form id="frm_allocation_basicInfo" name="Allocation - Basic info">
        <ber:fieldGroup>
            <ber:caption label="Basic info"/>
            <ber:field refId="at_boAllocation_id"/>
            <ber:field refId="at_boAllocation_name"/>
            <ber:field refId="at_boAllocation_type"/>
        </ber:fieldGroup>
    </ber:form>
mobileSimple
- mobileSimple defines form and its label which are used in section of detail.
    <ber:assignedForms>
        <ber:assignedForm usage="mobileSimple" refId="frm_allocation_basicInfo"/>
    </ber:assignedForms>
- showMobileSimple needs to be defined as true in light-forms.xml. This allows the assigned form and its label to be seen in the mobile application. The label of form is shown in mobile as header of form section.
<ber:formHeader showMobileSimple="true"/>
mobileFull
- mobileFull defines form which is used for editing.
    <ber:assignedForms>
        <ber:assignedForm usage="mobileFull" refId="frm_allocation_edit"/>
    </ber:assignedForms>
featureInfo
- featureInfo defines label of feature type. The label is value of attribute defined in featureInfo. It is part of definition of the feature type.
<ber:featureInfo refId="at_boAllocation_feature_info"/>
protocols.xml
- Standard LAS xml extension
- Protocol is feature type in model.xml.
- Relation type between source feature type (business entity, asset) and protocol feature type is needed.
- There are defined protocol types with light-form for particular source feature type with optional attribute condition which is inserted into
<ber:protocolSource></ber:protocolSource>.
    <ber:protocolDefinition>
      <ber:protocolSource>
        <ber:featureTypeArray>
          <ber:featureType xlink:href="model.xml#ft_boWorkOrder"/>
        </ber:featureTypeArray>
      </ber:protocolSource>
      <ber:protocolArray>
        <ber:protocol singleInstance="true">
          <ber:featureType xlink:href="model.xml#ft_boProtocolA"/>
          <ber:form type="lightForm" xlink:href="light-forms.xml#fd_protocolA"/>
          <ber:input refId="elMeterReading"/>
        </ber:protocol>
      </ber:protocolArray>
    </ber:protocolDefinition>
    <ber:protocolSource>
      <ber:sourceTemplate>
        <ber:condition>
          ('at_boWorkOrder_cl_boClassDrEM' = 0 OR
          'at_boWorkOrder_cl_boClassDrEM' = 1)
        </ber:condition>
      </ber:sourceTemplate>
    </ber:protocolSource>
- It is possible to copy attribute values from source feature type to protocol feature type using
<ber:protocolInput></ber:protocolInput>and<ber:copyValue></ber:copyValue>.
    <ber:protocolInput id="elMeterReading">
      <ber:copyValueArray>
        <ber:copyValue>
          <ber:inputAttribute xlink:href="model.xml#at_boWO_fr_elMeterReading/at_boElMeterReading_date"/>
          <ber:outputAttribute xlink:href="model.xml#at_boPrt_actDate"/>
        </ber:copyValue>
      </ber:copyValueArray>
    </ber:protocolInput>
!!! attention Only source feature type attribute values and attribute values from featureRef feature type as source attribute values are supported for copying now.
Metadata validation through LAS Administration Console among with LIDS Metadata reference documentation is currently under developement.
Mobile workforce offline
Common features
- Application start
- When the application is running in online mode and the connection is lost, it is switched to offline automatically and it can be further used as described below
- When the connection is established again, it is switched to online mode automatically and it is possible to continue in work with the application
- This scenario is used if the user has not made any changes to the data while offline
- If the user makes any change in the data in the offline mode, he must switch to the online mode manually (using the icon in the application)
- This means that even when the connection to the internet is available, the application will not switch to online mode automatically and the user must determine when to start synchronizing changes
- Everything is signalized to the user in the application - whether there is an internet connection or not, whether the application is in online or offline mode, whether there are offline changes that were not synchronized or not
- Application can be started directly in offline mode only in case of “basic” autentization.
- If the application was terminated in offline mode and the user starts it again and there is an internet connection available, the first action the user must perform is to synchronize the changes
- Only then can the user continue working
- Changes synchronization
- All changes made by the user in the application in offline mode are saved to the device in the changes queue
- To switch to online mode, the changes queue must first be sent to the application server
- Changes are sent one by one, chronologically
- If some particular change is not applied successfully on the application server, the user has following options:
- Retry saving the change
- Skip particular change and continue syncing
- End synchronization and remain offline (changes that were successfully synchronized are removed from the changes queue, those that were not processed remain in the queue)
- Data changes available in offline:
- Feature update
- New feature
- New related feature
- Business workflow action (if there is some business logic behind – it will be processed in the moment of synchronization – so it will not be visible in client application in offline mode)
- New attachment
- Workflow
- Available states and transitions for offline should be configured in mobile-workforce
- Application is able to display all current states of features in offline mode (even those, that are not available for offline)
- Application is able to change states in offline (only transitions that are configured for offline)
- Keep in mind, that if there is some business logic behind some particular transition, that this logic is not performed immediately in offline mode, but at the time of changes synchronization
- Data caching
- There are two types of caching mechanism:
- Workforce data caching (list of workorders, protocols, etc.)
- Map data caching
- These caching mechanism types are independent
- Workforce data caching:
- Immediately after the user logs in (online), the application stores all the data needed for offline use to the device
- Application launch may be slowed down because of this
- If the data stored in the cache will be downloaded again while the application is working online, the cache will always be refreshed
- Data caching content
- Workforce application can contain several “screens” defined by metadata configuration and which screen should be available in offline is a part of this configuration
- Immediately after the user logs in (online), the application stores all the data needed for offline use to the device
- Typically screen with list of service orders (allocations) for the particular day and worker is marked as screen for offline
- All related features needed to work with “screen cached features” can be also cached (e.g. work orders, electrometers, consumption, protocols, etc.)
- Needed relation types must be configured (using metadata group) and related features can be cached recursively
- Needed metadata parts, Codelists, Resources, … automatic caching
- Existing attachments are not downloaded to device cache at all!
- Map data caching:
- Similar mechanism as in LIDS Mobile application
- There is no automatic map layer caching mechanism
- User must run map layer data download:
- Layer list to cache must be specified (by user or by configuration)
- Map space must be specified by user
- There are two types of caching mechanism:
Configuration
Workforce data caching
- Screens – In mobile-workforce each screen which should be cached for offline must be marked by offline=”true” attribute in browseRef reference.
    <ber:screen type="allocations" name="My allocations" default="true">
        <ber:icon xlink:href="resource.xml#assignment-check"/>
        <ber:browseRefArray>
            <ber:browseRef refId="alloc" default="true" offline="true" relationOfflineMetaGroup="wfm-offline"/>
        </ber:browseRefArray>
        ...
    </ber:screen>
Default is false. Consider carefully which screens must be available in offline – data caching can be time consuming operation.
- Related data – by marking screen to cache data for offline – only features from screen browse are cached. In most cases more data are needed to cache for offline.
For example – when the screen contains allocations FTs, related work orders are needed for the application to be able to display the work order form. Then related features to work order which has to be integrated in work order form are needed to cache, and so on recursive.
- To achieve this, there must be metadata group specified in attribute relationOfflineMetaGroup in browseRef reference in screen definition. All needed relation types must be included in this metadata group (allocation-workOrder, workOrder-protocols, workOrder-documentAsset, documentAsset-assets, etc…)
    <ber:screen type="allocations" name="My allocations" default="true">
        <ber:icon xlink:href="resource.xml#assignment-check"/>
        <ber:browseRefArray>
            <ber:browseRef refId="alloc" default="true" offline="true" relationOfflineMetaGroup="wfm-offline"/>
        </ber:browseRefArray>
    ...
    </ber:screen>
- Tools – all tools in light-forms are not available in offline mode by default. Tools which should be available in offline mode must be marked by offline=”true” attribute in tool definition in toolbar.
    <ber:toolBar>
        <ber:featureTool name="Test button" offline="true">
            <ber:script>
                ...
            </ber:script>
        </ber:featureTool>
    </ber:toolBar>
- Workflow – All current states of feature are visible in offline mode without any configuration. There is no possibility to change the state in offline mode by default. State transitions, which should be available in offline mode should be configured in mobile-workforce.xml in offlineWorkflowArray section. There can be more workflows for different feature types defined. It must always be a subset of business workflow definition. There cannot be states or transitions defined, which are not defined in business workflow definition.
    <ber:offlineWorkflowArray>
        <ber:workflow>
            <ber:featureTypeArray>
                <ber:featureType xlink:href="model.xml#ft_boAlocation"/>
            </ber:featureTypeArray>
            <ber:stateAttribute xlink:href="model.xml#at_boAllocation_cl_allocationState/ca_boAllocationState_code"/>
            <ber:stateArray>
                <ber:state id="accepted" label="Accepted">
                    <ber:transitionArray>
                    <ber:transition targetState="inRealization" label="Start work"/>
                    </ber:transitionArray>
                </ber:state>
                <ber:state id="inRealization" label="In realization">
                    <ber:transitionArray>
                    <ber:transition targetState="interrupted" label="Iterrupt"/>
                    <ber:transition targetState="finished" label="Finish"/>
                    </ber:transitionArray>
                </ber:state>
                <ber:state id="interrupted" label="Interrupted">
                    <ber:transitionArray>
                    <ber:transition targetState="inRealization" label="Start work"/>
                    </ber:transitionArray>
                </ber:state>
                <ber:state id="finished" label="Finished"/>
            </ber:stateArray>
        </ber:workflow>
    </ber:offlineWorkflowArray>
Map caching
No configuration is necessary. User must start caching manually and specify layers and space. Layers to cache can be preconfigured in mobile-workforce.xml in offlineMap section. Then user specifies only space. Preparing map for offline
Workflow
- Available states and transitions for offline should be configured in
mobile-workforce.xml - Application is able to display all current states of features in offline mode (even those, that are not available for offline)
- Application is able to change states in offline (only transitions that are configured for offline)
        <ber:offlineWorkflowArray>
            <ber:workflow>
            <ber:featureTypeArray>
                <ber:featureType xlink:href="model.xml#ft_woAllocation"/>
            </ber:featureTypeArray>
            <ber:stateAttribute xlink:href="model.xml#at_woAllocation__state/ca_wfmActivityAllocationState_code"/>
            <ber:stateArray>
                <ber:state id="new" label="New">
                <ber:transitionArray>
                    <ber:transition targetState="inRealization"/>
                    <ber:transition targetState="closed"/>
                </ber:transitionArray>
                </ber:state>
                <ber:state id="inRealization" label="Realization">
                <ber:transitionArray>
                    <ber:transition targetState="closed"/>
                </ber:transitionArray>
                </ber:state>
                <ber:state id="closed" label="Closed"/>
            </ber:stateArray>
            </ber:workflow>
        </ber:offlineWorkflowArray>
!!! attention Keep in mind, that if there is some business logic behind some particular transition, that this logic is not performed immediately in offline mode, but at the time of changes synchronization
Data caching
- Immediately after the user logs in (online), the application stores all the data needed for offline use to the device. Note that, application launch may be slowed down because of this.
- If the data stored in the cache will be downloaded again while the application is working online, the cache will always be refreshed
- Data caching content
- Workforce application can contain several “screens” defined by metadata configuration and which screen should be available in offline is a part of this configuration
- Typically screen with list of service orders (allocations) for the particular day and worker is marked as screen for offline
- All related features needed to work with “screen cached features” can be also cached (e.g. work orders, electrometers, consumption, protocols, etc.)
- Needed relation types must be configured (using metadata group) and related features can be cached recursively
- Needed metadata parts, Codelists, Resources, … automatic caching
- Workforce application can contain several “screens” defined by metadata configuration and which screen should be available in offline is a part of this configuration
!!! attention Existing attachments are not downloaded to device cache at all!
Map component
There are three scenarios for using map component in Mobile Workforce app:
-
Common map component like in LIDS Mobile app
-
Map component for screen with list of features - e.g. allocations screen (screen in the sense of mobile-workforce.xml configuration)
-
Map component for list of related features in light-form
For map configurations, we use separate section in ber:mapComponentArray tags in mobile-workforce.xml. For every single configuration ber:mapComponent.
        <ber:mapComponentArray>
            <ber:mapComponent id="mainMap"> <!-- Configuration lately used in main screen -->
                <ber:serverRefArray>
                    <ber:serverRef refId="wms" defaultTurnOn="true" />
                    <ber:serverRef refId="wmts" defaultTurnOn="false" />
                    <ber:serverRef refId="vector" defaultTurnOn="false" />
                    <ber:serverRef refId="detailPlan" defaultTurnOn="false" />
                    <ber:serverRef refId="orthophoto" name="Satellite" defaultTurnOn="false" />
                </ber:serverRefArray>
            </ber:mapComponent>
            <ber:mapComponent id="allocationScreen">
                <ber:serverRefArray>
                    <ber:serverRef refId="wmts" name="Assets" defaultTurnOn="false" />
                    <ber:serverRef refId="orthophoto" name="Satellite" defaultTurnOn="true" />
                </ber:serverRefArray>
            </ber:mapComponent>
        </ber:mapComponentArray>
We prepared a general configuration for map components in the mapCompoment section. Now it's time to configure these maps for screens, where they should show and be used. The only thing we have to do is add mapComponent tag with the refId of a certain map we want to use and put it under ber:screen tag as any other screen configuration.
    <ber:screen type="map" name="Map"> <!-- Map screen definition -->
      <ber:icon xlink:href="resource.xml#auxiliary-devices"/>
      <ber:mapComponent refId="mainMap"/>
      <ber:parameterArray>
      </ber:parameterArray>
    </ber:screen>
    <ber:screen type="allocations" name="My allocations" default="true"> <!-- Screen definition for allocation with map component  -->
      <ber:icon xlink:href="resource.xml#assignment-check"/>
      <ber:mapComponent refId="allocationScreen" defaultVisible="false">
        <ber:parameterArray>
          <ber:parameter name="layerSelection" value="true" />
        </ber:parameterArray>
      </ber:mapComponent>
      <ber:browseRefArray>
        <ber:browseRef refId="alloc" default="true" offline="true"/>
      </ber:browseRefArray>
      <ber:parameterArray>
        <ber:parameter name="newItemAllowed" value="false"/>
        <ber:parameter name="locationAllowed" value="false"/>
        <ber:parameter name="useBigDetail" value="true"/>
        <ber:parameter name="modificationAllowed" value="true"/>
        <ber:parameter name="deleteAllowed" value="false"/>
      </ber:parameterArray>
    </ber:screen>
Preparing map for offline
Step one: When there is a configuration for „fullMap“ component in mobile-workforce.xml, user can switch to map using the main menu:

Step two: User can start the function to cache map data for certain map space – exactly the same way how it is implemented in LIDS Mobile:
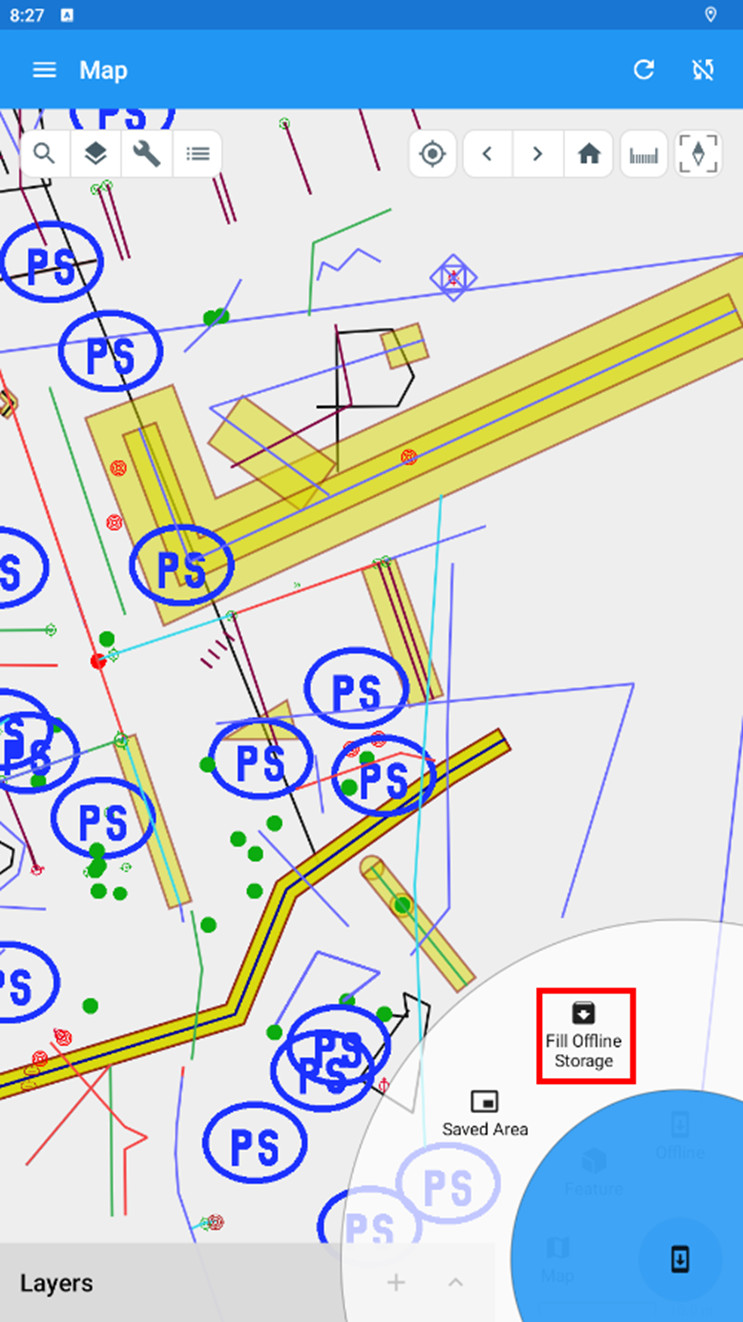
Step three: There is the Fill offline storage dialog with layer selection. Cached space is specified by actual map view range:
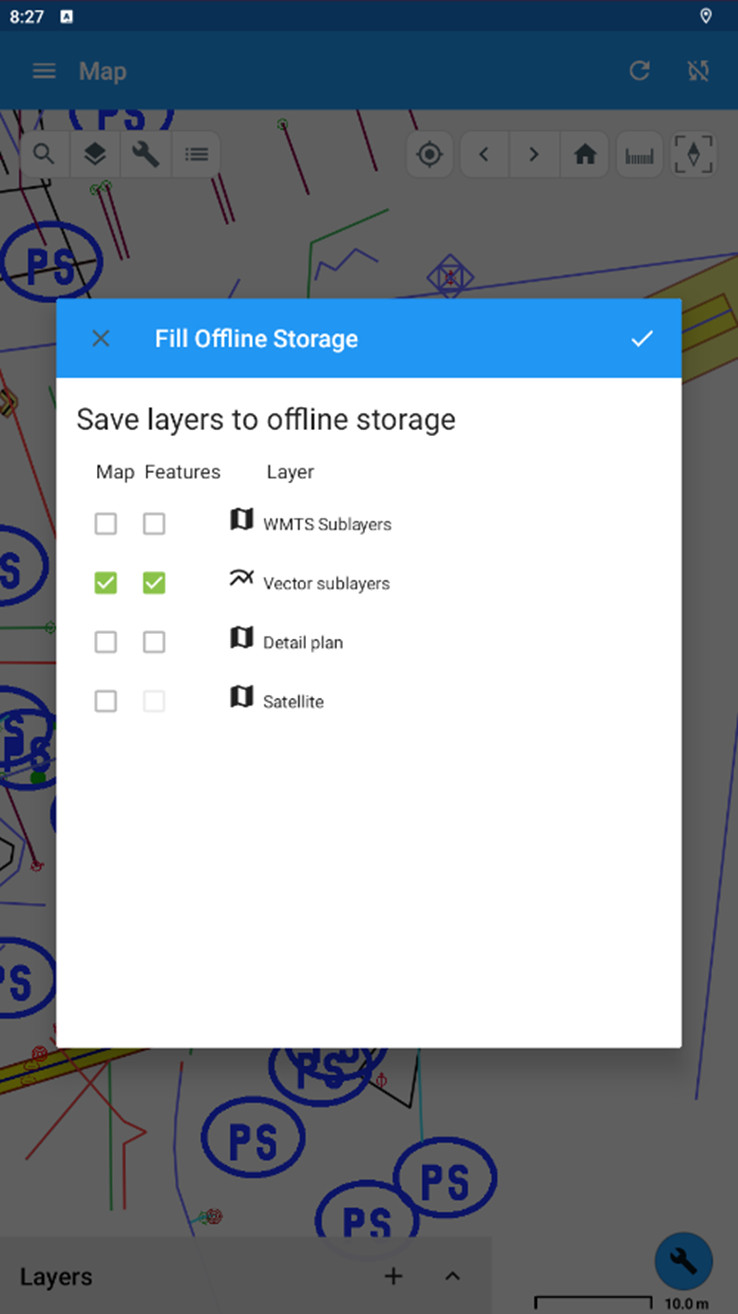
Step four: Third step can be ommited and layers to cache can be preconfigured for whole project in mobile.xml/mobile-workfoce.xml in section ber:offlineMap. So the user only start Fill Offline Storage function and no layer selection dialog is opened and caching process is started immediatelly for current map view range.