Messages
Level: Intermediate
Keywords: notifications, messages, user-service
The result: Send message via user-service
We use messaging in situations where we want to inform users about some fact (e.g. new Defect was Assigned to you). We can send them to (external) users who are not registered in the application and internal users (or entire user groups). We have a choice to send a message directly through the application or by email (or according to the user's preferences).
To send a message via e-mail, we must have defined a SMTP server, as in the case of Email notification. We must also have defined User service in tenant.
If we only want to send e-mail to specific e-mail addresses, then we use Email notification, or if we want to send SMS notification, then wen use SMS notifications.
More detailed configuration options of Message configuration and tenant can be found in Business Server Configuration.
Client metadata
For the definition on the client side, following web modules are used:
- Samo-user-messages-widget
- User messages app module
- User messages
- User messages dialog
- Messages configuration
Bussines metadata
We have several options for sending the message. They differ by invoking the sending process: using the action step and using ScriptingAPI.
Sending using action step
This option is used for simpler messages or when we do not need to obtain a complex data model.
If the action is invoked on an entity instance, we can access the entity instance directly from the data model. We also have an environment variables here. In the template we can access each attribute of the entity. This will fill the message body with data for specific entity instance.
At first, we need to define the send Message step in the desired entity business metadata.
        {
          "type": "sendMessage",
          "source": "no-reply@asseco-ce.com",
          "subject": "test",
          "templateGroup": "test",
          "briefTemplate": "requests/testEmailTemplateBrief",
          "template": "requests/testEmailTemplat",
          "labels": [
            "registration"
          ],
          "targets": [
              {
                  "recipientType": "user",
                  "recipient": "asseco",
                  "defaultChannels": [
                    "message"
                  ],
                  "mandatoryChannels": [
                    "email"
                ]
              },
              {
                "recipientType": "userGroup",
                "recipient": "SAMO-Operators",
                "defaultChannels": [
                  "message"
                ],
                "mandatoryChannels": [
                  "email"
              ]
            }
          ],
          "attachContext": true
        }
As elsewhere in json BS metadata, we can use placeholders here. For example, we get the source email address from environemtn variables "source": "{$portal.robotMail}" and the recipent from the entity attribute "recipient": "{#createdBy.username}".
More definition about Send message step can be found in Business Server Configuration.
Sending using ScriptingAPI
If we send the message using ScriptingAPI, we compile the whole model for the template ourselves.
        var feature = context.entity;

        var model = feature;
        feature._variables = context.variables;

        api.messages()
            .prepareSendMessage(context)
                .source("no-reply@asseco-ce.com")
                .subject("test")
                .templateGroup("test")
                .template("requests/testEmailTemplate")
                .briefTemplate("requests/testEmailTemplateBrief")
                .model(model)
                .addLabel("registration")
                .prepareAddTarget()
                    .recipientType("user")
                    .recipient("asseco")
                    .addDefaultChannel("message")
                    .addDefaultChannel("email")
                    .add()
                .prepareAddTarget()
                    .recipientType("userGroup")
                    .recipient("SAMO-Operators")
                    .addDefaultChannel("message")
                    .addMandatoryChannel("email")
                    .add()
                .prepareFeatureAttachment()
                    .attachmentId("677369054072634552295904")
                    .attach()
                .prepareTemporaryFileAttachment()
                    .temporaryFileId("677369054072634552295905")
                    .attach()
                .prepareFileAttachment()
                    .templateGroup("test")
                    .template("testWordTemplate")
                    .model(feature)
                    .name("testAttachment.pdf")
                    .outputType("pdf")
                    .attach()
                .prepareEntityAttachment()
                    .entityType(feature.type)
                    .entityId(feature.id)
                    .attach()
                .send();
In practice, however, the data model is often divided into several parts, and the individual entities and variables are in separate attributes, as in the following example. This will achieve clarity. In the template, we must access the attributes via dot notation {$feature.at_base_code}.
        var feature = context.entity;
        var applicant = api.features()
            .prepareGetFeature(context)
                .entityRef(feature.at_request_ref_applicant)
                .get();
        var model = {
            _variables: context.variables,
            feature: feature,
            applicant: applicant
        };
We can use the prepareFeatureAttachment(), prepareFileAttachment() or prepareTemporaryFileAttachment() methods to attach message attachments, but they are optional. Usually messages are sent without attachments. Method prepareFileAttachment() creates a attachment from the template.
Content
This is an example of one message that user recieves in the application. Attributes subject, content, labels and created are displayed.

Fig. 1: Example of message in User message app module
In the user preferences settings, it is possible to define the labels and channels that the user wants to receive.
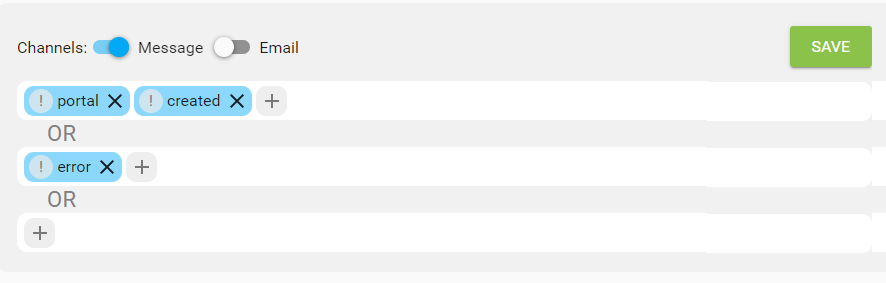
Fig. 2: Configure rules for receiving messages
Labels
We can attach several labels to the message. We enter labels in the source code of Send Message Step via .prepareSendMessage() and .addLabel(). These codes should be translated in Gateway resources (e.g. gateway\applications\applicationName\resources\strings\samo-demo_en.json). This will ensure that the labels are displayed correctly for each language version.
    {
        "messageLabels": {
            "registration": "Registration",
            "contract": "Contract"
        }
    }
Channels
There are two types of channels available: email and message. Emails are sent based on the email address in the user's profile and the defined SMTP server in the user-service. Messages are sent directly in the application and are displayed using the user module User messages app module.
We enter channels in the source code of Send Message Step via .prepareSendMessage() and .prepareAddTarget().addDefaultChannel().
Brief
If we are sending a message, it is good to also attach a brief. This file is usually in .txt format and its purpose is to show a brief insight into the content of the message. This brief is displayed only in the application, in the detail of the message, and in the email is only the content of the main template.
Simple template
In the template, we have access to all attributes of the entity and also to environment variables. We use Freemarker notations.
    ```` html
        <#include "_header.html"/>
        Hello user,
        the state of the entity with code ${at_base_code} has changed. You can check it at ${_variables.portalUrl} ...
        <#include "_footer.html"/>
More informations about templating can be found on the Reports page.
In order not to repeat the header and footer of the document in all templates, we will divide them into several files and use the import
    <html>
        <head>
            <meta http-equiv="Content-Type" content="text/html; charset=utf-8">
            <style type="text/css">
            ...
        </head>
        <body>
            <div class="footerWrapper">
                <table class="footer" width="100%" cellpadding="0" cellspacing="0">
                    ...
                </table>
            </div>
        </body>
    </html>
The name of the template can be written together with the language mutation testEmailTemplate_en or not testEmailTemplate and in this case the language will be derived from the user context. The file extension is also derived automatically.
In practice, therefore, we have several versions of the template for one message
        lids-as
        └───business-service
            └───templates
                └───documents
                    └───test
                        └───requests
                            └───testEmailTemplate_en.html
                            └───testEmailTemplate_de.html
                            └───testEmailTemplate_cs.html
                            └───testEmailTemplateBrief_en.txt
                            └───testEmailTemplateBrief_de.txt
                            └───testEmailTemplateBrief_cs.txt
                            ...