SAMO-docx Engine (*.pdf)
Level: Jedi Knight/Jedi Master
Keywords: templates, generating pdf files, samo-docx engine
The result: Possibility to create template in *.docx format and generate *.pdf file filled with enity attributes
Using the Template Engine we can generate a pdf file containing the entity attributes into a predefined template in a docx file.
To generate it, we use the scripting API to set the necessary inputs to create the pdf file. This file is created as an attachment to a specific entity instance, which needs to be accounted for in the API method settings.
    api.features().attachments()
        .prepareCreateAttachmentFromTemplateResult(context)
        .entityRef(WO) //Reference the entity to which we will "pin" the attachment. In addition to entityRef(), we can also use entityId() and entityType().
        .templateEngine("samo-docx") //The name of the templating engine we will use to generate it. Currently, we are using **samo-docx**.
        .templateId("bs/protocols/types/templateA.docx") //Path to template file
        .fileName("final_protocol") //Name of the generated file
        .attachmentType("att_boDocument") //Type of attachment defined in WO entity
        .output("pdf")
        .model(inputModel) // Model with defined attributes for final protocol
        .create();
If you want to study more about generating attachment go to Scrpting API new attachment
But first, we have to prepare data for object inputModel.
Preparing data in JavaScript
Before generating the pdf report, it is necessary to prepare all the data that we want to be included in the final document.
Use the scripting API to retrieve all the entities that will be passed to the inputModel object.
For example, let's load a Work Order. The final object will look approximately like this:
    {
        "id" : 101,
        "createDate" : 1628165269000,
        "createdBy" : {
                "id" : 1,
                "username" : "JOSS.WHEDON",
                "firstName" : Joss,
                "lastName" : "Whedon"
        },
        "at_workOrder_name" : "Replacement of auxiliary device",
        "at_workOrder_code" : "WO2300658501",
        "at_workOrder_note" : "It is important to do this task ASAP.",
        "at_workOrder_warrantyClaims" : {
            "ca_yesNo_description" : "No",
            "ca_yesNo_id" : 0
        },
        "at_workOrder_fr_customer" : {
            "id" : 8,
            "at_customer_name" : "Nathan Fillion",
            "at_customer_address" : "Hollywood 123, USA"
        },
        "at_workOrder_fr_worker": {
            "id" : 42,
            "at_worker_name" : "Arthur Dent",
            "at_customer_qualification" : "The Engineer"
        }
    }
This object is stored in the workOrder variable, which contains the structure shown above.
Let's also load the Log entity. For this example, we'll use a simpler structure:
    {
        "id" : 101,
        "createDate" : 1628165269000,
        "createdBy" : {
                "id" : 1,
                "username" : "ARTHUR.DENT",
                "firstName" : "Arthur",
                "lastName" : "Dent"
        },
        "at_protocol_name" : "Replacement of device",
        "at_protocol_code" : "AUX",
        "at_protocol_note" : "Replaced without problems.",
        "at_protocol_success" : {
            "ca_yesNo_description" : "Yes",
            "ca_yesNo_id" : 1
        },
        "at_protocol_realizDate" : 1690243200000,
        "at_protocol_durationInMinutes" : 90,
        "at_protocol_signature": "data:image/png;base64,iVBORw0KGgoAAAANSUhEUgAAAD4AAABgCAYAAABFRcHDAAAAAXNSR0IArs4c6QAAAARzQklUCAgICHwIZIgAAALqSURBVHic7Zq9TjJBFIbfNQQp0NASEkoCHcUWbrgCSgoTCwpCg4SGkFAQKTQCiQQwROONyC0oFCSWunZegnELgsV8xWdWV/5s5swkc55q5gzhPe+ePbM/YAkhBAxkT3UCqmDjpsHGTYONmwYbNw02bhps3DTYuGmwcdNg46qxLItUTxvjg8GAVlBoxng8JtGxhOC3rMrY2/ufxsvLix97e3uTqyn12/9Ir9fD/f090um0HyuVSlI1tTnVc7kcHh4e/LllWZCZmhYVB4DHx8fAPJ/PS9VTbvz4+BgAEIvFAnHHcaTqKjcej8cBAP1+PxA/ODiQK0xy0dzBdDpdiY1GI6mayisOAEdHRysxz/Okaio13mw2N649PT3JFZd6Pu0gmUyKi4uLtWuJREKqdkjuYd3OtruzSqUiVVuLG5jFYoFIJBKIeZ6HaDQqTVNZj7daLX98dXW1si7TNAB1Pb6/vy/a7bYQQohwOEyur6zHF4uFPy4UCuT6WvT4fD6Hbdukmkp6/PT0NDCnNg0oqrjsR86/oKTiQgjU6/WN66+vr9Jz0KLHf5PJZPD8/CxVg7zixWJx52dOTk6k50FecR36G1BQcdd1qSXXQm48lUoF5pPJhDoFAMTGz8/PAQDdbtePXV9fU6bwDeX98Tq529vbwLzT6ZDkQlrxcrm8EqvVaoF5NpslyUXL6zgFWrxsVAGZ8V0//F9eXhJl8gXJTiK+NzbXdTeuD4dDqnToNre7uzsA6zc4APj4+KB9PCU7xF9Uq1V/fHNzQy3vQ1Lx9/d3f3x2duaPQyF1b7dJLmfhcBjL5XLj+mw2g23bpAeCpOKfn59b1x3HQaPRoEjlG4p+2iVTLpcp0ghAcqrr8gz+Ey3u3Kj/1QgoNP7zJ2IVZwOJ8XXGDg8PKaQ3wk9npsHGKVGxi/+G3Lgu13Ry4zqYBrjHzYONmwYbNw02bhps3DTYuGmwcdNg46bBxk2DjZsGGzcNNm4abNw0/gEkFT8jtc0/8wAAAABJRU5ErkJggg=="
    }
If there are no specific data requirements, we can simply pass these two variables to the model.
    var inputModel = {
            workOrder: workOrder,
            protocol: protocol
        }
But one adjustment to the data is necessary. When we look at the protocol, we see that instead of a date, we get a value in a timestamp. So we'll have to modify these values to write the correct date format to the log and not the timestamp.
    var protocolDate = api.format().dateTime(context)    //This variable now contains a string that stores the date in the format dd.MM.yyyy.
        .formatString("dd.MM.yyyy")
        .timestamp(protocol.at_protocol_realizDate)
        .getFormattedString();

    var inputModel = {
        workOrder: workOrder,
        protocolDate: protocolDate,
        protocol: protocol
    }
We have the data in the scripting API ready. It's time to prepare the template.
How to prepare template in *.docx file
First of all, we need to set up Word to show us the developer tools.
In the top bar, click on File and select Options from the left menu.
In the new window, we move to Customize Ribbon section in the left menu. We now have a split window in front of us. On the right-hand side, we need to find the Developer item, which we check and press Ok.
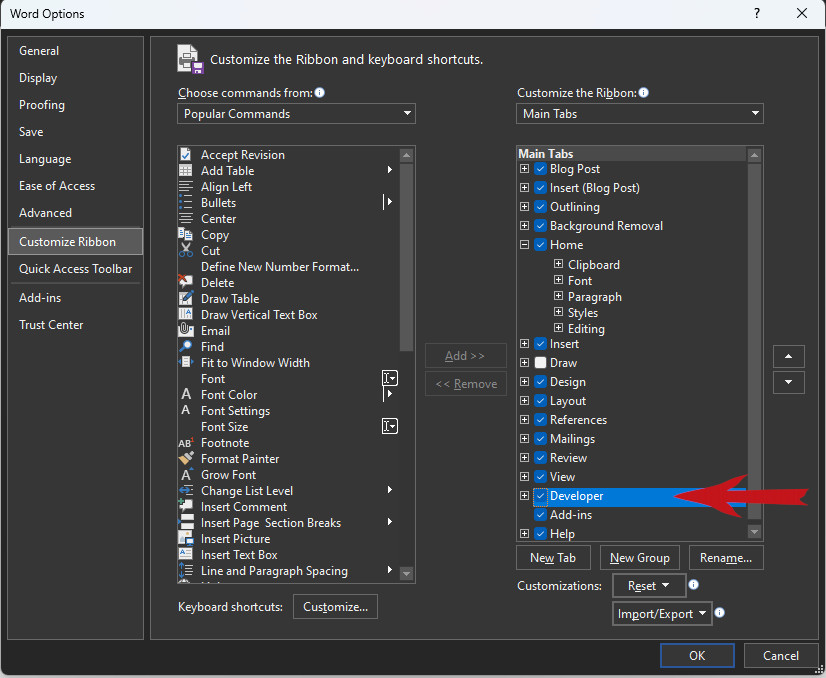
Fig. 1: How to show Developer tools
The design of the protocol is entirely up to you. The Samo-docx engine can handle both images and tables.
Let's show how to insert data into this template so that the engine knows where to insert the correct values.
In Word, in the developer tools, click on Rich Text Content Control. This will create the object that is now in the document.

Fig. 2: Create RTCC
The next step is to click Properties, which will open a new window.

Fig. 3: Where open properties
Here we fill the Tittle and Tag items with the eval value.
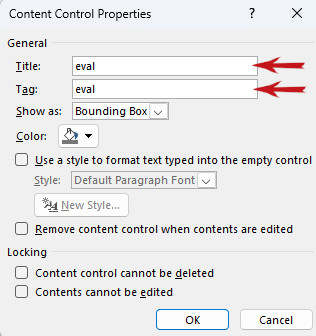
Fig. 4: Values for TITTLE and TAG
Now I have prepared an object into which we will insert the variable names as we have defined in the model. The entry must enclose the variable name in round brackets ending with an exclamation mark.
This is what the template looks like in Word:
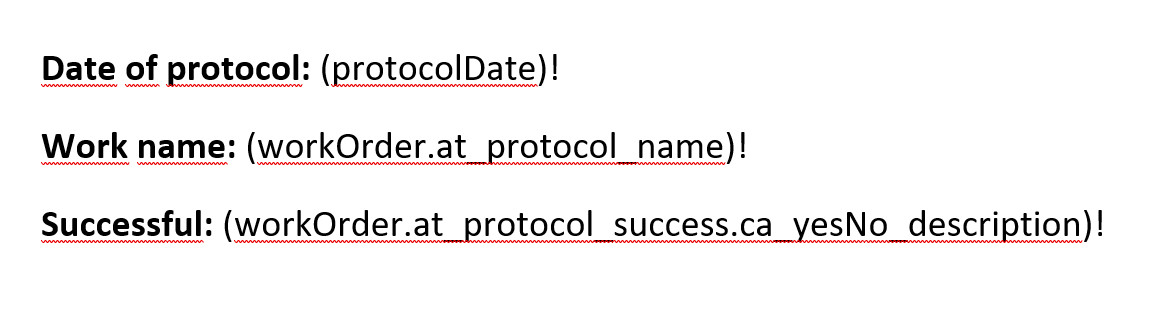
Fig. 5: DOCX file with variables as template
Result of *.pdf file generation:

Fig. 6: PDF file with values
Where to find/create templates for generating templates folder:
lids-as
│
└───business-service
    │
    └───templates
        │
        └───documents\protocols\types
            │
            └───templateA.docx
Other useful templating tips
Design Mode must be activated for the correct and accurate display of the mentioned patterns.

Fig. 7: How to show Design Mode
This is what the template looks like in Word in Design Mode:

Fig. 8: DOCX file with variables as template in Design Mode
Writing template marks
Tags can be written in two different ways.
Odd marks

Fig. 9: Example of eval function with odd marks
Pair marks

Fig. 10: Example of eval function with pair marks
The difference is that incomplete tags do not create a new paragraph.
Some functions can only use one way of writing tags.
There can be many variants of invalid notation, so if the generation is not working correctly, it is a good idea to check if there is an error in this way of noting the mark.
As for the eval function, only the variant with odd marks is a valid entry, the variant with even marks is not valid.
Forcing a non-existent reference to be written
If the reference is enclosed in brackets ( )! the function will not require its existence. In case the reference does not exist in the data model, the template will be generated successfully and no error will occur.
Always write referencies with ( )!, this is especially important for beginners. The downside is that if you make a mistake, you may not notice it right away, especially if the template is large. The placeholder will simply be empty after generating the report.
Example of non-existent reference with ( )!:

Fig. 11: Example of non-existent reference with ( )!
Result: the report will be generated and instead of this placeholder there will be only an empty space.
Example of non-existent reference without ( )!:

Fig. 12: Example of non-existent reference without ( )!
Result: the template is not generated and ends with an error message.
Inserting an image
Use the image function to insert an image. As in the case of the eval function, the image function is only valid in the odd-marked variant.

Fig. 13: Example of image reference
The input data from the data model must be in Base64 format, including the header.
data:image/png;base64,iVBORw0KGgoAAAANSUhEUgAAA...
A fixed image width can also be set:

Fig. 14: Example of image reference with fixed image width
or one can explicitly set the full width of the image:

Fig. 15: Example of image reference with full image width
Functions overview
If you want to try the following examples practically, use the model below in the script and omit all the test. prefixes from the placeholders in the functions of the examples in the Word template.
    var model =  {
        "attributeString": "Example string",
        "attributeString1": "Another example string",
        "attributeString2": {
            "value": 1
        },
        "attributeNum": 12,
        "attributeNum1": 3,
        "objectsArray": [
            {
                "objectAttributeNum": 55,
                "objectAttributeString": "Example of a string in an object array"
            },
            {
                "objectAttributeNum": 1221,
                "objectAttributeString": "Example of a string1 in an object array"
            },
            {
                "objectAttributeNum": 76,
                "objectAttributeString": "Example of a string2 in an object array"
            }
        ],
        "html": "<html><p>This is an example of HTML</p></html>"
    };
Eval
Valid notation: odd marks
Invalid notation: pair marks
Examples:

Fig. 16: Examples of simple use of eval function
Strings can be concatenated:

Fig. 17: Example of concatenation in eval function
Formatting of an eval that contains multiple references:
![]()
Fig. 18: Example of formatting of eval that contains multiple references
If eval contains multiple references, formatting can only be done using an html tag inside the function. This option is more suitable for the more experienced users. In newer versions, this approach might not work; therefore, I recommend splitting eval as shown in the example in Fig. 20.
This case of formatting multiple references does not work:

Fig. 19: Example of wrong formatting of eval that contains multiple references
If eval contains multiple references, it can only be formatted as a whole. You cannot use multiple formatting in one eval, the format of the last character in the parenthesis will always be taken into account.
There is an example of a valid solution of formatting to the example above without using html tags:

Fig. 20: Example of formatting of eval that contains multiple references without html tags
Formatting examples:

Fig. 21: Examples of formatting of eval function
It is also possible to apply a function:

Fig. 22: Example of applying function in eval function to get string length
![]()
Fig. 23: Example of applying function in eval function to get value of string attribute in upper-case characters
Basic mathematical operations can be applied to numeric attributes:
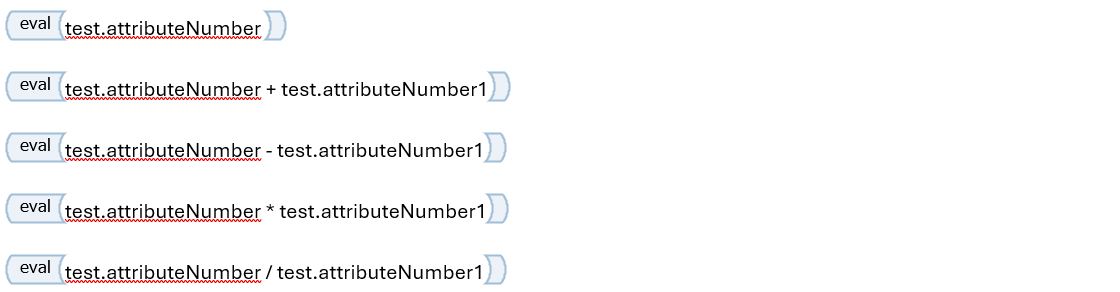
Fig. 24: Examples of applying basic mathematical operations to numeric attributes
Do not use a character – (long dash) like a minus!
Image
Valid notation: odd marks
Invalid notation: pair marks
There you can find the rest of the image function explanation and examples.
HTML function
Valid notation: pair marks
Invalid notation: odd marks
HTML can also be inserted if the conditions are met.
The conditions are:
- HTML must be valid.
- It must always be wrapped in the HTML root
<html> </html>element. - The HTML placeholder must always be filled, otherwise the template will throw an error.
- Unable to apply optional data entry
( )!. - HTML marks (tags) in Word must be pair, or an error will occur.
- There must not be an odd number of tags in html, each tag must form a pair. This also applies to odd tags such as
<br>,<hr>etc.
Example of static HTML:

Fig. 25: Example of static HTML
Example of HTML reference from data model:

Fig. 26: Example of HTML reference from data model
HTML functions can be useful for generating tables.
IF ELSE condition
Valid notation:

Fig. 27: Valid notation of IF ELSE function
Use case schema:

Fig. 28: Use case of IF ELSE function
Examples:
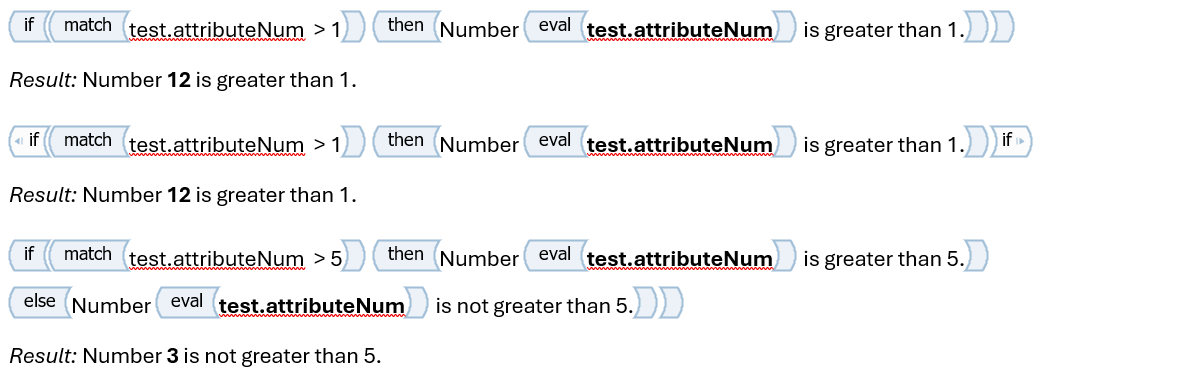
Fig. 29: Examples of IF ELSE function
IF nested within IF is not possible!
Switch case
Valid notation:

Fig. 30: Valid notation of Switch case function
Use case schema:

Fig. 31: Use case of Switch case function
Examples:

Fig. 32: Example of Switch case function
Repeat
Valid notation:

Fig. 33: Valid notation of Repeat function
Example without indentation:

Fig. 34: Example of Repeat function without indentation
Example with indentation:
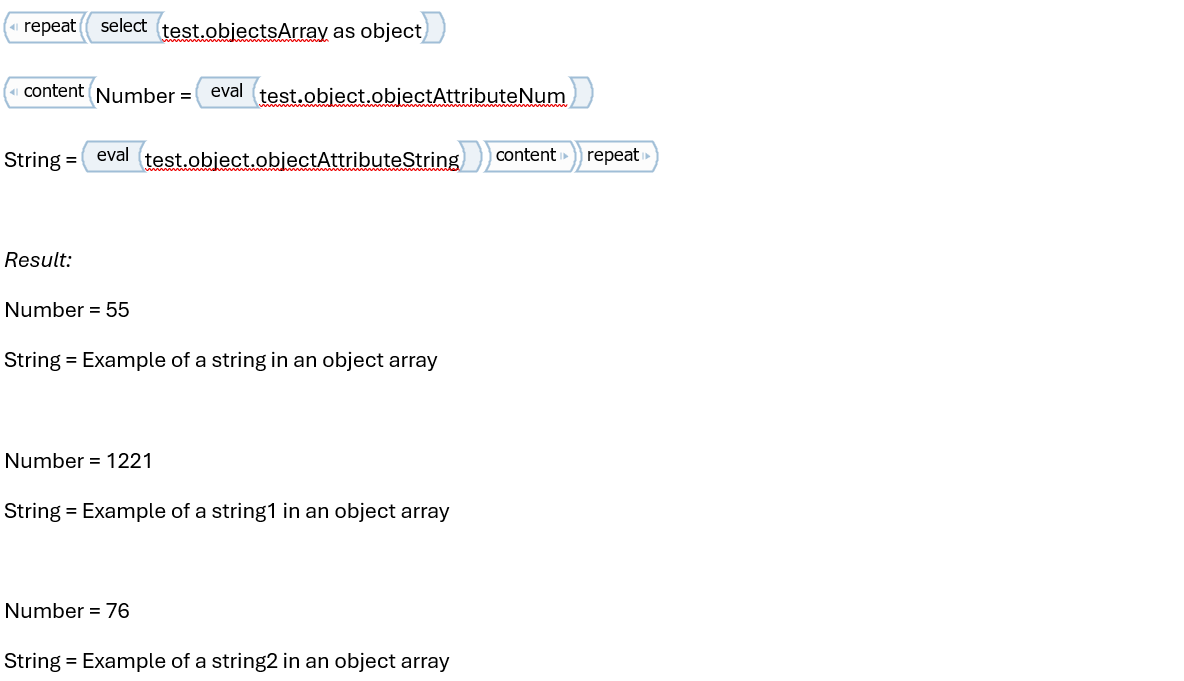
Fig. 35: Example of Repeat function with indentation
Example of combining repeat and if with an additional size function application:
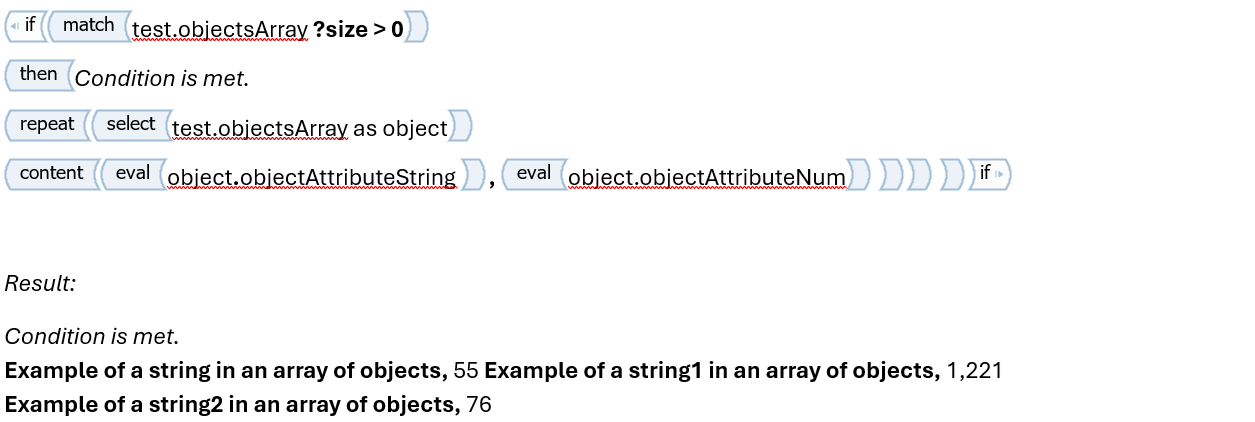
Fig. 36: Example of combining Repeat and If functions with an additional size function application
Example of an additional filtering function application:
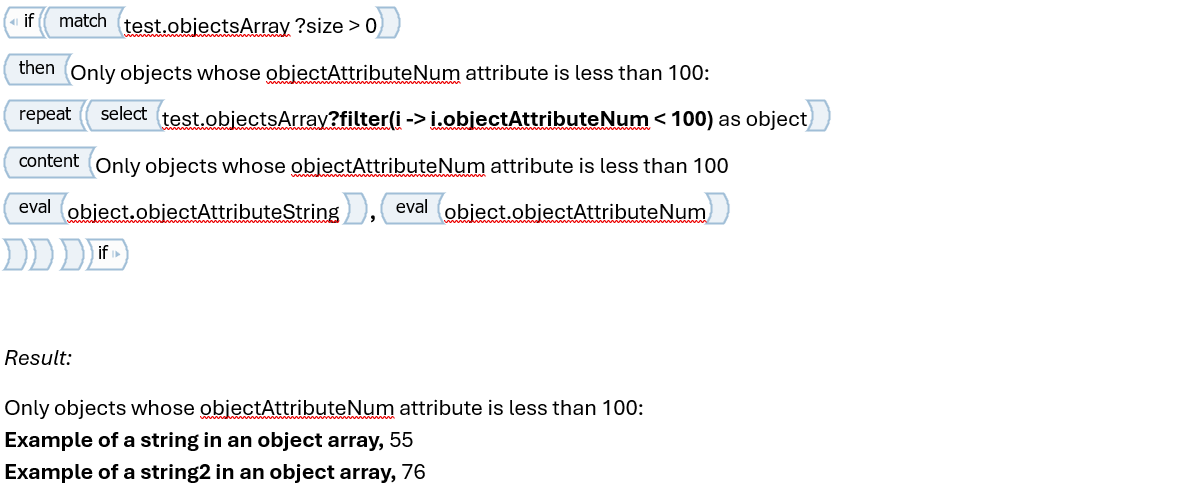
Fig. 37: Example of Repeat function with an additional filtering function application
Checkbox
There are two types:
- activeCheckBox
- checkBox
Valid notation: odd marks
Invalid notation: pair marks
Example of an active checkbox:

Fig. 38: Example of an active checkbox
Example of a passive checkbox:

Fig. 39: Example of an passive checkbox
Table function
Valid notation:

Fig. 40: Valid notation of Table function
Example:
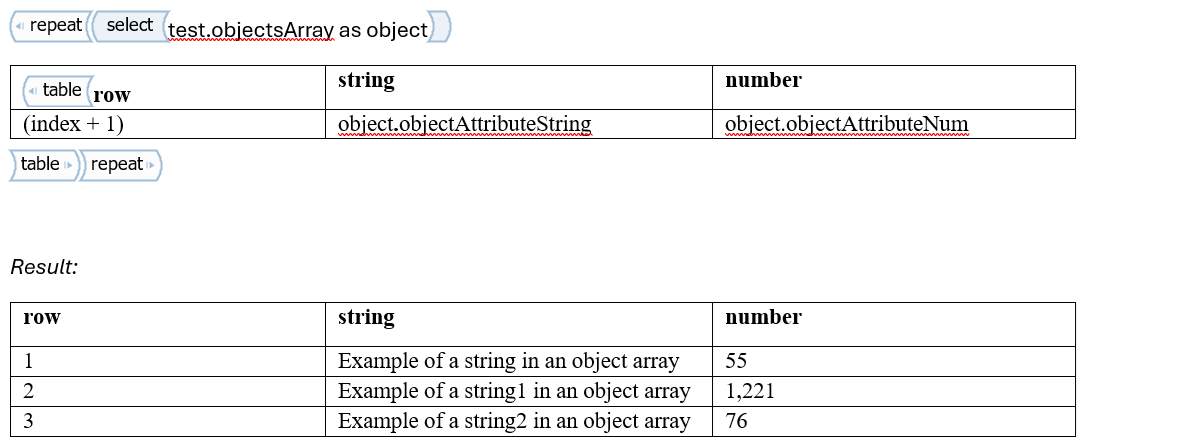
Fig. 41: Example of Table function