From local to Server
Level: Beginner
Keywords: local environment, server environment, changes
The result: overview of the implementation process, steps needed to successfully apply changes from your local environment to server
How to apply changes from files to the local environment and to the server?
This page describes only one type of implementation process, the one which is most commonly used in Brno Gis & Utility division. It relies on using locally running copy of project environment using localtron tool. This includes local LIDS, Gateway, connection to remote User Service, Elastic Search and database. This approach also assumes using Gitlab for metadata versioning with configured Continuous Integration & Delivery.
In conventional projects (e.g. AIS) you make changes directly in your local copy of project repository (C:\dev\gitlab\samo\customers\ais\ais-project\metadata).
However, by packaged projects it is a littlebit different. For working with packaged project it is highly recommended installing pkg-cli utility (see Implementation Tools). In packaged projects, you make changes in the individual packages, which you have cloned to your computer. These packages can be cloned in various folders. When configuring your local environment of specific project, you create subfolder metadata-packages (or configuration in case of new package cli) in your local project repository (C:\dev\gitlab\samo\customers\customerName\projectName) and there will be all packages, which are used in the project. The link between Gitlab repositories (the files where you make your changes) and local copy of project metadata (the content which is shown in the client) is maintained using yarn technology. This link is set up during the installation of your local environment, if you follow steps from the Setting up local environment guide.
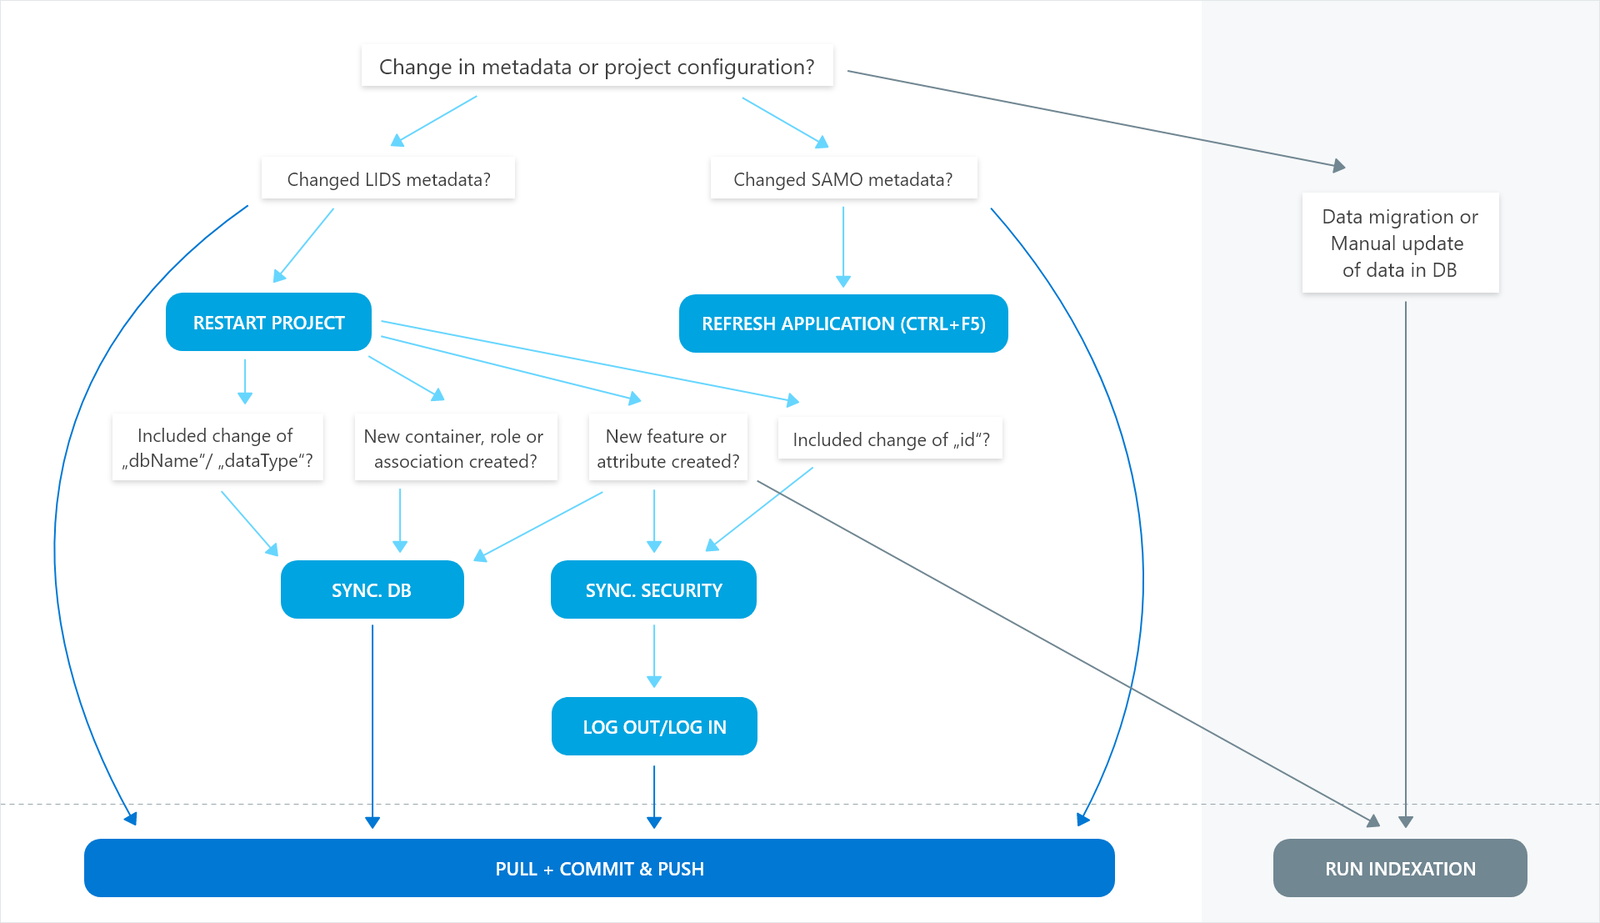
If you make changes in the configuration files and want to see these changes first in your locally running environment and, after proper testing, also in the server environment, you need to follow certain steps. These steps depend on the specific change you have made. Following graph will help you decide, which steps you need to make:
Database Synchronization
The data structures from your LIDS model.xml must correspond to the database data structure. This is maintained via database synchronization line. In the LIDS Administration console in the section Database > LIDS DS you can create Change List and then export SQL file containing all necessary SQL commands to apply changes from LIDS model.xml to the database.
Security Synchronization
All users can be granted specific access (e.g. filter, query, update, insert, delete) to all features and attributes. After creating new featureType or adding a new attribute, the security synchronization must be run in order to create corresponding records in database security tables. This synchronization can be started from the LIDS Administration console in the section Database > Security DS and can run only in privileged mode (can be set in section Project). After the synchronization ends, don't forget to release the privileged mode. Also, you need to log out from the application and log in again in order for new security rules to be applied.
Elastic Search indexation
Elastic Search creates indexes for records and makes the searching quicker and more efficient. Therefore, each time some new data structures or new records are created in the database, in order to see them in the application immediately, you the indexes must be generated. The indexation can be set up to run automatically at a certain time (e.g. midnight). Manually it can be started from the LIDS Administration console in the section SAMO search extension > Index Features / Index Codelists.
Pull + Commit & Push
This step is usually done in the end, when you have properly tested your changes and are ready to publish them. As mentioned above, the Gitlab versioning system is used for this publishing.
- Simple
git pullcommand will pull any changes which were published to the server by other colleagues and are not yet present in your repository copy. However, if your working tree is not clear (meaning you have made some changes to the repository files), you need tostashthese changes to a temporary location at first, then make yourgit pullandpopthe stashed changes back. - After your local repository is ahead of the branch (meaning you have successfully pulled all other changes of your colleagues and now the project differs only because of your changes), you can
commitandpushyour changes to the Gitlab. Please try to write your commit messages short, informative and try to include the code of JIRA task, that you are currently working on. With a certain configuration (which most projects already have implemented), your commits will even link with provided JIRA task and you will be able to see them in the Comments or Jigit tab. - (Optional). Depending on the configuration of Continuous Integration on your project, you will (or won't) have to start the Pipeline. Pipeline is a production line, with preconfigured steps (e.g. restart docker containers, publish documentation...), which are conducted at a certain time (e.g. midnight), or after you start the pipeline manually in Gitlab.
git stash
git pull
git stash pop
git commit -am "SAMOHD-0000 Fix menu icon visibility"
git push
More about git commands and how to run them in terminal, or Visual Code Studio can be found in the GIT chapter.