Backdrop Maps
Backdrop maps are auxiliary graphic data lying under the graphic presentation of the active data – features. They can be both vector and raster (special case of raster backdrop is binaryRasterBackdropType).
Basic Goals and Principles
-
Downloading raster data with sufficient performance. For this purpose, defined tile cache is used, which is represented by set of pre-generated tiles (PNG pictures with rasterized data).
-
Structure and store parameters for tile cache and other tiles parameters are defined by LIDS project metadata.
-
Generating, updating and downloading tiles are performed by means of standard LIDS AS services.
-
Files forming a hierarchical structure (tile cache) are stored in specified file folder, which must be accessible for LIDS Application Server.
-
This data is provided (downloaded) by TMS or WMTS services.
For your project you can use many different types of backdrop maps, which are also implemented differently. Following summary gives an overview of different implementations of backdrop maps based on their data source, behaviour and usability in LIDS Explorer and LIDS Browser.
Raster Backdrop Maps
WMS layer from external data source
If you want to use WMS layer from external data source (for example Open Street Maps) as a backdrop map for your project, you need to proceed as follows:
Configuration of XML files
First you need to define backdrop map in model.xml. Layer array in this case contains definition of plainLayer with id, name and format. You can also define maxSize (width and height) of the layer in pixels. Attribute maxParallelRequests defines how many parallel requests can the server handle. This number affects the loading speed and responsiveness of the display.
Example: Definition of backdrop type for WMS layer in model.xml.
  <ber:backdropTypeArray>
...
    <ber:rasterBackdropType id="bd_osm_world" name="OpenStreetMap-WMS">
      <ber:description>Open street map WMS for whole world</ber:description>
      <ber:layerArray>
        <ber:plainLayer id="lay_bd_osm_world_png" name="PNG Open Street Map WMS - world" format="png">
        <ber:maxSize width="512" height="512"/>
        <ber:maxParallelRequests>3</ber:maxParallelRequests>
        </ber:plainLayer>
      </ber:layerArray>
    </ber:rasterBackdropType>
...
  </ber:backdropTypeArray>
You may want to display chosen backdrop map also in LIDS Browser. You need to add its reference to included layers root.
Example: Including WMS layer in browser.xml.
    <ber:folder name="Other backdrops" id="rs_folder_back1">
...
      <ber:layer refId="bd_osm_world"/>
...
    </ber:folder>
Next you need to define wms backdrop type in option.xml.
Example: Definition of WMS layer from external data source in option.xml.
  <ber:externalBackdropTypeArray>
...
    <ber:wmsBackdropType version="1.1.1">
      <ber:backdropType xlink:href="model.xml#bd_osm_world"/>
      <ber:url>http://129.206.228.72/cached/osm?</ber:url>
      <ber:srs>EPSG:31467</ber:srs>
      <ber:format>image/png</ber:format>
      <ber:timeout>20000</ber:timeout>
      <ber:method>GET</ber:method>
      <ber:additionalParams>
        <ber:param key="LAYERS" value="osm_auto:all"/>
        <ber:param key="STYLES" value=""/>
        <ber:param key="TRANSPARENT" value="TRUE"/>
      </ber:additionalParams>
    </ber:wmsBackdropType>
...
  </ber:externalBackdropTypeArray>
Backdrop type tag contains reference to definition of backdrop map in model.xml. URL attribute refers to storage path of external data source. Other attributes refer to parameters of GetMap request.
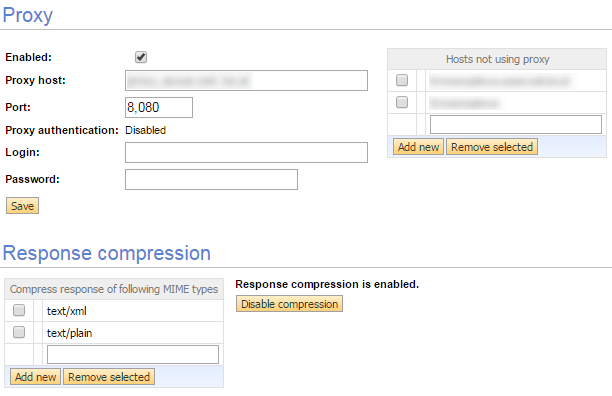
If you work network infrastructure with proxy access, there might occur a problem with external wms layers display (from the internet). You need to define access to the internet through proxy setting in LIDS Administration Console, see figure below.
WMS layer from external datasource with defined hierarchy
To speed up loading and displaying of backdrop map from external datasource, you can define its hierarchy, and the backdrop map will be divided to tiles, which will than load separately.
Configuring XML files
Configuration of XML files is similar to chapter 30.2.1.1. First you need to define backdrop map in model.xml, then you need to define wms backdrop type in option.xml. Next you need to define tms layer in map-service.xml with cache and structure. At last, you can include tms layer in browser.xml.
You don´t need to generate hierarchical structure in LIDS Administration Console. You can let the server to cache data of lower levels on demand – when users are panning over the map in the LIDS Browser.
Raster layer with hierarchical structure from internal data source (basic formats tiff, jpeg, png)
Raster layers with predefined hierarchical structure have an advantage of quick loading and displaying, because the hierarchy is cached beforehand for predefined zoom levels. Following chapters describe implementation of this backdrop map type.
Configuration of XML files
First you need to define backdrop map in model.xml. Layer array in this case contains definition of mainTiledLayer and hierarchicalLayer both with id, name and format. You also need to define hierarchy, where decreaseRatio responds to steps of the hierarchy (higher means bigger steps, less continuity) and tileWidth and tileHeight (in pixels) respond to the level of detail.
Example: Definition of backdrop type for raster layer with hierarchy in model.xml.
  <ber:backdropTypeArray>
...
    <ber:rasterBackdropType id="bd_03" name="City map">
      <ber:description>Hierarchical raster</ber:description>
      <ber:layerArray>
        <ber:mainTiledLayer id="lay_bd_03_tiff" name="TIFF City Map" format="tiff">
          <ber:hierarchicalLayer id="lay_bd_03_jpeg" name="JPEG City Map" format="jpeg">
            <ber:hierarchy decreaseRatio="3" tileWidth="1000" tileHeight="1000"/>
          </ber:hierarchicalLayer>
        </ber:mainTiledLayer>
      </ber:layerArray>
    </ber:rasterBackdropType>
...
  </ber:backdropTypeArray>
LIDS Explorer uses only hierarchical layer (jpeg pyramid) for display of this backdrop map type. User can manage the source files in main tiled layer (tiff source files) through the LIDS Administration Console.
Configuration of folder hierarchy for source files
According to the definition of backdrop maps in model.xml, LIDS Administration Console automatically creates folder hierarchy for expected source files, on page Backdrops. You can adjust it (and save) for your needs but remember to use logical names.

Registration of source files
Source raster files need to be registered in the database in order to generate hierarchical structure. This can be done either by LIDS Explorer or using LIDSUltra Light Client that can be found on http://<LIDS_AS_URL>/ utils/request.html address.
Using LIDS Explorer
This option is used when working with small amount of source data – tens, hundreds of files.
-
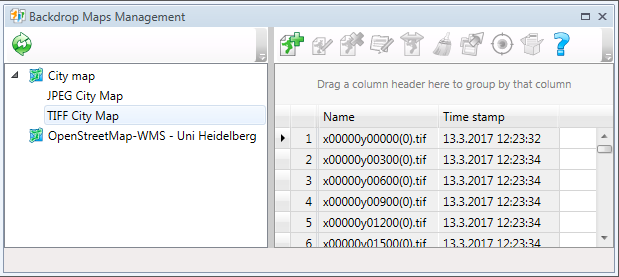
First you need to start Backdrop Maps Management, then choose specific backdrop map (City Map) and its main tile layer (TIFF City Map).
-
Then you click Add File and choose source TIFF raster files (one or more at once). Source files will be registered in the database.
Using LIDS Ultra Light Client
This option is used when working with large amount of data, approximately more than 1000 files, gigabytes of data.
First you need to upload chosen source files to the prepared folder (City_map\tiff_main_tiled). Then in LIDS Ultra Light Client choose Backdrop Service from Core Services and query Register files in layer. The query looks like this:
<ber:registerBackdropLayer xmlns:ber="http://www.berit.com/ber"
    service="RegisterBackdropLayer"
    version="1.0.0"
    updateMode="true">
  <ber:layerId>lay_bd_03_tiff</ber:layerId>
  <ber:validFrom>2017-01-01 00:00:00</ber:validFrom>
  <ber:validTo>2018-01-01 00:00:00</ber:validTo>
</ber:registerBackdropLayer>
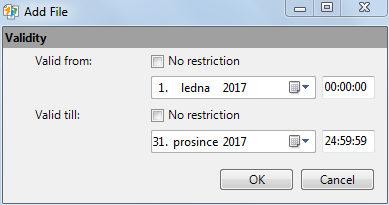
For registering of source files, you need to fill in the right layer id (which refers to main tile layer). Starting with version LIDS 7.4.0, there is also possibility to work with backdrop map history and set valid period of source files. This way you will be able to display also the old versions of backdrop maps.
These prerequisites must be fulfilled before registering TIFF files to main tile layer:
-
All source TIFF files must have a georeference.
-
All source TIFF files must have the same color depth and cannot be mixed full colors and monochromatic TIFFs.
Now you just click Sent request and the source files will be registered in the database.
Generating hierarchical structure
Generation of hierarchical structure is done by LIDS Administration Console from the page Backdrops. Before start, you need to check if the parameters of generation – input (main tiled structure) and output (hierarchical structure) are set properly. The own generation of hierarchical structure for given backdrop map can be activated by this icon: ![]()
The following dialog appears:
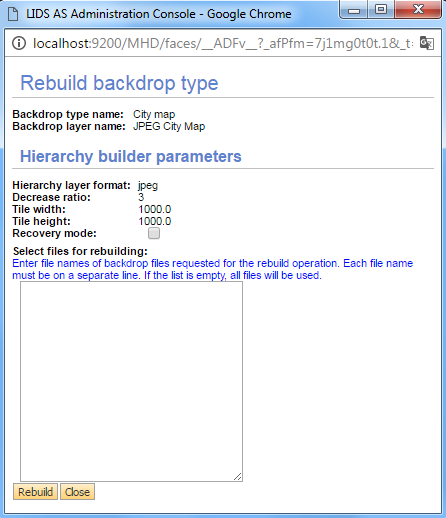
Enter the file names of backdrop files and run Rebuild. Raster JPEG files for the whole hierarchical structure should be created in your source folder (C:\lids\lidsdemo\backdrops\City map\jpeg_hierarchical).
Database – table LIDS_BACKDROP
Both registration of source raster files and generation of hierarchical structure makes changes in the database, specifically in the table LIDS_BACKDROP. Following scripts are used to make sure if the changes were carried out correctly.
SELECT COUNT(*) FROM lids_backdrop WHERE bt_id = 'bd_03' AND STRUCT LIKE 'tiled';
SELECT COUNT(*) FROM lids_backdrop WHERE bt_id = 'bd_03' AND STRUCT LIKE 'hierarchical';
LIDS Browser
You may want to display chosen backdrop map also in LIDS Browser. You need to add its reference to included layers root.
Example: Including raster layer with hierarchy in browser.xml.
  <ber:includedLayers>
...
    <ber:layer refId="bd_03"/>
...
  </ber:includedLayers>
In this definition the backdrop is downloaded via WMS services using the source files, not the hierarchical tiles. If the source files are big image data, the display can be really slow. Therefore, it is better to use hierarchical structure through the definition of TMS layer in map-service.xml. Remember that you also must add defined tms layer to included layers root in browser.xml.
Example: Definition of tms for raster layer with hierarchy in browser.xml.
  <ber:tms>
...
    <ber:tmsLayers>
...
      <ber:tmsLayer id="tms_bd_03" sourceWMSLayer="bd_03">
      </ber:tmsLayer>
...
 </ber:tmsLayers>
...
  </ber:tms>
After Browser configuration in LIDS Administration Console, the defined tms layer should display in the Console, see figure below. Since you have already defined the backdrop hierarchy, defined tms layer automatically creates reference to it and no further changes are needed.

Raster layer with hierarchical structure from internal datasource (MicroStation formats hmr, cot, cit)
This type of backdrop map is implemented much the same as the previous type, see chapter 30.2.2. The only difference is format of source raster data files, which server during the registration automatically converts to tiff for further processing. In this chapter we only mention configuration of XML files, which differs a little from the previous backdrop type.
These special MicroStation formats can be uploaded to the server only with LIDS Edit license (valid for 7.4.0 and older version branch).
Configuration of XML files
First you need to define backdrop map in model.xml. Layer array in this case contains definition of mainTiledLayer, hierarchicalLayer and tiledLayers all of them with id, name and format. You also need to define hierarchy, where decreaseRatio responds to steps of the hierarchy (higher means bigger steps, less continuity) and tileWidth and tileHeight (in pixels) respond to the level of detail. Single tiled layers refer to different formats of source data, which can be combined together to create main tiled layer.
Example: Definition of backdrop type for raster layer with hierarchy in model.xml.
  <ber:backdropTypeArray>
...
    <ber:rasterBackdropType id="bd_tr" name="Tests - raster">
      <ber:description>Hierarchical raster - for tests</ber:description>
      <ber:layerArray>
        <ber:mainTiledLayer id="lay_bd_tr_tiff" name="TIFF Tests" format="tiff">
          <ber:hierarchicalLayer id="lay_bd_tr_tiff_h" name="TIFF hierarchical tests" format="tiff">
            <ber:hierarchy decreaseRatio="3" tileWidth="1000" tileHeight="1000"/>
          </ber:hierarchicalLayer>
        </ber:mainTiledLayer>
        <ber:tiledLayer id="lay_bd_tr_hmr" name="HMR Tests" format="hmr"/>
        <ber:tiledLayer id="lay_bd_tr_cot" name="COT Tests" format="cot"/>
        <ber:tiledLayer id="lay_bd_tr_cit" name="CIT Tests" format="cit"/>
      </ber:layerArray>
    </ber:rasterBackdropType>
...
  </ber:backdropTypeArray>
Historically versioned raster layer with hierarchical structure
This type of backdrop map is used when you need to display same data from different time periods. The implementation is much the same as the previous type, see chapter 30.2.2. In this chapter we only mention configuration of XML files and usage in LIDS Browser, which differs a little from the previous backdrop type.
Configuration of XML files
First you need to define backdrop map in model.xml. Difference between not versioned and versioned backdrop is in definition of raster backdrop type in setting of attribute versioned to “true”. Layer array in this case contains definition of mainTiledLayer and hierarchicalLayers all of them with id, name and format. You also need to define hierarchy for every hierarchical layer, where decreaseRatio responds to steps of the hierarchy (higher means bigger steps, less continuity) and tileWidth and tileHeight (in pixels) respond to the level of detail.
Example: Definition of backdrop type for versioned raster layer with hierarchy in model.xml.
  <ber:backdropTypeArray>
...
    <ber:rasterBackdropType id="bd_02" name="Orthophoto" versioned="true">
      <ber:description>Hierarchical raster</ber:description>
      <ber:featureType refId="ft_b_orthophoto"/>
      <ber:layerArray>
        <ber:mainTiledLayer id="lay_bd_02_tiff" name="TIFF Orthophoto" format="tiff">
          <ber:hierarchicalLayer id="lay_bd_02_jpeg" name="JPEG Orthophoto" format="jpeg">
            <ber:hierarchy decreaseRatio="3" tileWidth="1000" tileHeight="1000"/>
          </ber:hierarchicalLayer>
          <ber:hierarchicalLayer id="lay_bd_02_jpeg_2013" name="JPEG Orthophoto - 2013" format="jpeg" date="2013-01-01 00:00:00">
            <ber:hierarchy decreaseRatio="3" tileWidth="1000" tileHeight="1000"/>
          </ber:hierarchicalLayer>
          <ber:hierarchicalLayer id="lay_bd_02_jpeg_2014" name="JPEG Orthophoto - 2014" format="jpeg" date="2014-01-01 00:00:00">
            <ber:hierarchy decreaseRatio="3" tileWidth="1000" tileHeight="1000"/>
          </ber:hierarchicalLayer>
        </ber:mainTiledLayer>
      </ber:layerArray>
    </ber:rasterBackdropType>
...
  </ber:backdropTypeArray>
Registration of source files
Registration of source files runs similar as in chapter 30.2.3.3. However, to support historical versioning, you have to fill in valid from and valid to parameters. In LIDS Ultra Light client you just fill in right datum in tags validFrom and validTo. In LIDS Explorer following dialog automatically appears:
LIDS Browser
There are also two possible ways of adding historically versioned raster layer to LIDS Browser. One is to only add this layer to included layers in browser.xml and the other one is trough the definition of tms layer in map-service.xml, see chapter 30.2.3.6. However, you need to define single tms layer for every hierarchical layer.
Example: Definition of tms for versioned raster layer with hierarchy in browser.xml.
  <ber:tms>
    <ber:tmsLayers>
...
      <ber:tmsLayer id="tms_orthophoto" sourceWMSLayer="bd_02"/>
      <ber:tmsLayer id="tms_orthophoto_2014" sourceWMSLayer="bd_02" date="2014-01-01"/>
      <ber:tmsLayer id="tms_orthophoto_2013" sourceWMSLayer="bd_02" date="2013-01-01"/>
...
    </ber:tmsLayers>
...
  </ber:tms>
Vector Backdrop Maps
Backdrop layer from internal vector data
It is also possible to create backdrop layer from internal vector data.
Configuration of XML files
Layer array in this case contains definition of tiled layers with id, name and format. You can combine source data of different format (DGN and DWG).
Example: Definition of backdrop type for layer from internal vector data in model.xml.
  <ber:backdropTypeArray>
...
    <ber:vectorBackdropType id="bd_01" name="Overview map">
      <ber:description>More detailed vector backdrop</ber:description>
      <ber:layerArray>
        <ber:tiledLayer id="lay_bd_01_dgn" name="DGN overview map" format="dgn"/>
        <ber:tiledLayer id="lay_bd_01_dwg" name="DWG overview map" format="dwg"/>
      </ber:layerArray>
    </ber:vectorBackdropType>
...
  </ber:backdropTypeArray>
Registration of source files
After configuring model.xml, LIDS Administration Console automatically created folder hierarchy for expected source files. You can see it on page Backdrops.
Since you are using internal data, you have to register them in the database, similar as in chapter 30.2.3.3. After registration you created backdrop layer can be displayed.
LIDS Browser
To display created backdrop map in LIDS Browser you need to add this layer to included layers in browser.xml.
Example: Including raster layer with hierarchy in browser.xml.
  <ber:includedLayers>
...
    <ber:layer refId="bd_01"/>
...
  </ber:includedLayers>
TMS layer from LIDS project vector data
This type of implementation is used when you want to create backdrop map from your own LIDS project vector data, using predefined feature types.
Configuration of XML files
Assuming you already have data, which you want to use for backdrop, defined in model.xml, the only adaptations are made in map-service.xml.
First you need to define tmsLayer and reference to source.
Source of the data can be defined three ways:
-
Setdefinition: refers to created template, which contains chosen feature types
-
Category: refers to id of the category (from model.xml), which contains chosen feature types
-
Backdrop: refers to id of backdrop type (from model.xml)
You also need to define cache format (for vector data usually PNG) and structure. Structure tag in map-service.xml contains reference to structure defined further.
Example: Definition of tmsLayer from project vector data in map-service.xml.
  <ber:tms>
...
    <ber:tmsLayers>
...
      <ber:tmsLayer id="tms_detailed_plan" sourceWMSLayer="cat_01">
        <ber:cache format="png">
          <ber:structure refId="fixedDetailedStruct"/>
        </ber:cache>
      </ber:tmsLayer>
...
    </ber:tmsLayers>
...
  </ber:tms>
Structure can be defined in two possible ways:
-
fixed detailed structure: contains specific values of scale, usually corresponding to defined scales in browser.xml
-
level-defined: uses minimal and maximal scale denominator and given number of levels to compute actual hierarchy
Example: Definition of structures in map-service.xml.
      <ber:structure id="fixedDetailedStruct">
        <ber:boundingBox minX="3451400" minY="5481600" maxX="3451850" maxY="5481900"/>
        <ber:tileSize width="512" height="512"/>
        <ber:fixedScaleDenominators>
          <ber:scaleDenominator>200000</ber:scaleDenominator>
          <ber:scaleDenominator>100000</ber:scaleDenominator>
          <ber:scaleDenominator>50000</ber:scaleDenominator>
          <ber:scaleDenominator>20000</ber:scaleDenominator>
          <ber:scaleDenominator>10000</ber:scaleDenominator>
          <ber:scaleDenominator>5000</ber:scaleDenominator>
          <ber:scaleDenominator>2000</ber:scaleDenominator>
          <ber:scaleDenominator>1000</ber:scaleDenominator>
          <ber:scaleDenominator>500</ber:scaleDenominator>
          <ber:scaleDenominator>200</ber:scaleDenominator>
          <ber:scaleDenominator>100</ber:scaleDenominator>
        </ber:fixedScaleDenominators>
        <ber:gridOrigin x="3451605" y="5481732"/>
      </ber:structure>
...
      <ber:structure id="googleStruct" levels="22" srs="EPSG:900913">
        <ber:tileSize width="256" height="256"/>
        <ber:scaleDenominators min="282" max="591658711"/>
        <ber:gridOrigin x="-20037508.34" y="20037508.34"/>
      </ber:structure>
You can also define coordinates of a bounding box, which acts as a spatial restriction for created tms layer.
Id “googleStruct” means the compatible structure with zoom levels of Google Maps or Openstreetmap is used (20 levels starting from 1 : 1128).
Generating hierarchical structure
After configuring model.xml, LIDS Administration Console automatically created folder hierarchy for expected source files. You can see it on page Browser & Map services under TMS layers. Since you are working with created project data, you don´t need to register any source files. However, you need to generate hierarchical structure using following icon: ![]()
The following dialog appears:
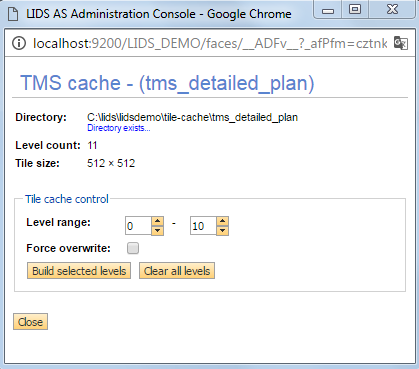
Run Build selected levels. Raster PNG files for the whole hierarchical structure should be created in your source folder (C:\lids\lidsdemo\tile-cache\tms_detailed_plan).
User can also Clear all levels – it means to delete all cached data from the backdrop folder.
The lower levels of the structure (level 8, 9, 10 from the picture) takes too much time to generate, so sometimes is better to generate only top levels and let the server to cache data of lower levels on demand – when users are panning over the map in the LIDS Browser.
LIDS Browser
To display created vector backdrop map in LIDS Browser you need to add this layer to included layers in browser.xml.
Example: Including TMS layer from project vector data in browser.xml.
  <ber:includedLayers>
...
      <ber:layer refId="tms_ detailed_plan" queryable="false"/>
...
  </ber:includedLayers>
map-service.xml Structure and Possibilities
This metadata file is used mainly for serve map services – WMS, TMS, WMTS. Not only for LIDS itself but also to share services to other systems or public.
Example: map-service.xml.
<?xml version="1.0" encoding="UTF-8"?>
<ber:modelMapService xmlns:ber="http://www.berit.com/ber" xmlns:xlink="http://www.w3.org/1999/xlink">
  <ber:version>
    <ber:metadata>1</ber:metadata>
    <ber:minClient>8888</ber:minClient>
    <ber:minAS>11809</ber:minAS>
  </ber:version>
  <ber:wms>
    <ber:contexts>
      <ber:context id="">
        <ber:layer refId="setdefinition_282"/>
        <ber:layer refId="setdefinition_201105021258"/>
        <ber:layer refId="cat_lighting"/>
        <ber:layer refId="setdefinition_2870828876057082"/>
      </ber:context>
      <ber:context id="RedliningSketch">
        <ber:layer refId="cat_5070000">
          <ber:dimension name="time" units="ISO8601" unitSymbol="H" default="2015-09-03" multipleValues="0" nearestValue="true" current="1" value="1900-01-01/2100-12-31/P1D"/>
          <ber:dimension name="reference_time" default="2015-09-03" units="ISO8601"/>
        </ber:layer>
        <ber:layer refId="cat_5080000" title="Sketch"/>
      </ber:context>
      <ber:context id="UtilityNet">
        <ber:layer refId="cat_5010000"/>
        <ber:layer refId="cat_5020000"/>
      </ber:context>
      <ber:context id="Water">
        <ber:layer refId="cat_5010000"/>
      </ber:context>
      <ber:context id="Lighting">
        <ber:layer refId="cat_lighting"/>
      </ber:context>
    </ber:contexts>
    <ber:referenceTimeMapping>
      <ber:referenceTimeAttribute>
        <ber:featureType xlink:href="model.xml#ft_b_orthophoto"/>
        <ber:attribute xlink:href="model.xml#at_b_ortho_date"/>
      </ber:referenceTimeAttribute>
    </ber:referenceTimeMapping>
    <ber:backgroundColor>#FFFFFF</ber:backgroundColor>
  </ber:wms>
  <ber:tms>
    <ber:tmsLayers>
      <ber:tmsLayer id="tms_water" sourceWMSLayer="cat_5010000">
        <ber:cache format="png">
          <ber:structure refId="fixedDetailedStruct"/>
        </ber:cache>
      </ber:tmsLayer>
      <ber:tmsLayer id="tms_electricity" sourceWMSLayer="cat_5020000">
        <ber:cache format="png">
          <ber:structure refId="detailedStruct"/>
        </ber:cache>
      </ber:tmsLayer>
      <ber:tmsLayer id="tms_telco" sourceWMSLayer="setdefinition_1978024840483229">
        <ber:cache format="png">
          <ber:structure refId="detailedStruct"/>
        </ber:cache>
      </ber:tmsLayer>
      <ber:tmsLayer id="tms_detailed_plan" sourceWMSLayer="bd_07">
        <ber:cache format="png">
          <ber:structure refId="fixedDetailedStruct"/>
        </ber:cache>
      </ber:tmsLayer>
      <ber:tmsLayer id="tms_detailed_plan_v8" sourceWMSLayer="bd_07_v8">
        <ber:cache format="png">
          <ber:structure refId="fixedDetailedStruct"/>
        </ber:cache>
      </ber:tmsLayer>
      <ber:tmsLayer id="tms_uo" sourceWMSLayer="cat_5010000">
        <ber:cache format="png">
          <ber:structure refId="googleStruct"/>
        </ber:cache>
      </ber:tmsLayer>
      <ber:tmsLayer id="tms_orthophoto" sourceWMSLayer="bd_02"/>
      <ber:tmsLayer id="tms_orthophoto_2014" sourceWMSLayer="bd_02" date="2014-01-01"/>
      <ber:tmsLayer id="tms_orthophoto_2013" sourceWMSLayer="bd_02" date="2013-01-01"/>
      <ber:tmsLayer id="tms_citymap" sourceWMSLayer="bd_03"/>
      <ber:tmsLayer id="tms_electr_detail" sourceWMSLayer="setdefinition_99729004563735008">
        <ber:cache format="png">
          <ber:structure refId="detailedStruct"/>
        </ber:cache>
      </ber:tmsLayer>
      <ber:tmsLayer id="tms_osm_world_mundalis" sourceWMSLayer="bd_osm_world_mundalis">
        <ber:cache format="png">
          <ber:structure refId="fixedDetailedStruct"/>
        </ber:cache>
      </ber:tmsLayer>
    </ber:tmsLayers>
    <ber:tmsStructures>
      <ber:structure id="detailedStruct" levels="11">
        <ber:tileSize width="500" height="500"/>
        <ber:scaleDenominators min="128" max="131072"/>
        <ber:gridOrigin x="3451605" y="5481732"/>
      </ber:structure>
      <ber:structure id="fixedDetailedStruct">
        <ber:tileSize width="512" height="512"/>
        <ber:fixedScaleDenominators>
          <ber:scaleDenominator>200000</ber:scaleDenominator>
          <ber:scaleDenominator>100000</ber:scaleDenominator>
          <ber:scaleDenominator>50000</ber:scaleDenominator>
          <ber:scaleDenominator>20000</ber:scaleDenominator>
          <ber:scaleDenominator>10000</ber:scaleDenominator>
          <ber:scaleDenominator>5000</ber:scaleDenominator>
          <ber:scaleDenominator>2000</ber:scaleDenominator>
          <ber:scaleDenominator>1000</ber:scaleDenominator>
          <ber:scaleDenominator>500</ber:scaleDenominator>
          <ber:scaleDenominator>200</ber:scaleDenominator>
          <ber:scaleDenominator>100</ber:scaleDenominator>
        </ber:fixedScaleDenominators>
        <ber:gridOrigin x="3451605" y="5481732"/>
      </ber:structure>
      <ber:structure id="googleStruct" levels="22" srs="EPSG:900913">
        <ber:tileSize width="256" height="256"/>
        <ber:scaleDenominators min="282" max="591658711"/>
        <ber:gridOrigin x="-20037508.34" y="20037508.34"/>
      </ber:structure>
    </ber:tmsStructures>
  </ber:tms>
  <ber:wmts>
    <ber:contexts>
      <ber:context id="">
        <ber:layer refId="tms_water"/>
        <ber:layer refId="tms_electricity"/>
        <ber:layer refId="tms_telco"/>
        <ber:layer refId="tms_detailed_plan"/>
        <ber:layer refId="tms_uo"/>
        <ber:layer refId="tms_orthophoto"/>
        <ber:layer refId="tms_orthophoto_2014"/>
        <ber:layer refId="tms_orthophoto_2013"/>
        <ber:layer refId="tms_citymap"/>
        <ber:layer refId="tms_electr_detail"/>
      </ber:context>
      <ber:context id="Water">
        <ber:layer refId="tms_water"/>
        <ber:layer refId="tms_orthophoto"/>
      </ber:context>
    </ber:contexts>
  </ber:wmts>
</ber:modelMapService>
WMS Contexts and Services
Using the WMS contexts LIDS AS will share specific WMS services created from:
-
Category (defined in model.xml)
-
Setdefinition (template from database)
-
Backdrop (defined in model.xml)
These services can be found on address http://[lids-as]/WebMapService/[context]?&SERVICE=WMS
Optionally it’s possible to define fixed response URL which is not derived from the LIDS AS URL.
<ber:wms>
    <ber:contexts>
      <ber:context id=" " url="">
        <ber:layer refId="category_1"/>
        <ber:layer refId="template_1"/>
        <ber:layer refId="backdrop_1"/>
        ...
TMS layers
Using the TMS Layer LIDS AS will share services through TMS specification. TMS services can be created from:
-
Category (defined in model.xml)
-
Setdefinition (setting from database)
-
Backdrop (defined in model.xml, using own backdrop hierarchy derived from decreaseRatio)
TMS layer can include historical state of data on particular day specified by date attribute.
  <ber:tms>
    <ber:tmsLayers>
      <ber:tmsLayer id="tms_water" sourceWMSLayer="cat_5010000">
        <ber:cache format="png">
          <ber:structure refId="fixedDetailedStruct"/>
        </ber:cache>
      </ber:tmsLayer>
      ...
      <ber:tmsLayer id="tms_orthophoto_2017" sourceWMSLayer="bd_02" date="2017-01-01"/>
      ...
TMS Layers use hierarchy defined in structure element. Structure can be defined as:
-
Using scale denominators
-
Using min max scales and number of levels between (openstreetmap, google maps)
-
If backdrop with hierarchy is defined as source for TMS, the structure from hierarchical layers is used (Connected to a backdrop hierarchy – says list of TMS layers)
    <ber:tmsStructures>
      <ber:structure id="detailedStruct" levels="11">
        <ber:boundingBox minX="3449000" minY="5476300" maxX="3464400" maxY="5490500"/>
        <ber:tileSize width="500" height="500"/>
        <ber:scaleDenominators min="128" max="131072"/>
        <ber:gridOrigin x="3451605" y="5481732"/>
      </ber:structure>
      <ber:structure id="fixedDetailedStruct">
        <ber:tileSize width="512" height="512"/>
        <ber:fixedScaleDenominators>
          <ber:scaleDenominator>20000</ber:scaleDenominator>
          <ber:scaleDenominator>10000</ber:scaleDenominator>
          <ber:scaleDenominator>5000</ber:scaleDenominator>
          <ber:scaleDenominator>2000</ber:scaleDenominator>
          <ber:scaleDenominator>1000</ber:scaleDenominator>
        </ber:fixedScaleDenominators>
        <ber:gridOrigin x="3451605" y="5481732"/>
      </ber:structure>
      <ber:structure id="googleStruct" levels="22" srs="EPSG:900913">
        <ber:tileSize width="256" height="256"/>
        <ber:scaleDenominators min="282" max="591658711"/>
        <ber:gridOrigin x="-20037508.34" y="20037508.34"/>
      </ber:structure>
    </ber:tmsStructures>
Every TMS structure can be limited to the defined “boundingBox”, but it is not mandatory – the maximal area can be counted from the source data (raster files) or model range coordinates. If boundingBox is defined, the coordinates shouldn’t include decimal digits.
The “tileSize” number is in pixels usually between 256x256 and 1024x1024. This is really about how the data tiles will look like. In some cases, small tiles are better for mobile devices and small displays (even 128x128). Bigger tiles are better for performance. So, you can start with 512x512 and check if it is ok for your project. 768x768 can be used too.
How many "levels" to use? If you use it with Google Maps or Openstreetmaps, the googleStruct is suggested, the zoom levels will be the same, it will be better look and feel. But you can use also your defined levels as you want, just to have maybe not so much data/levels on the server.
It’s possible to publish TMS in coordinate system different from the project default. The coordinate system is defined by srs attribute in the structure definition. The coordinate system must be included in multi-crs.xml extension. This possibility is limited to the vector layers only.
Services
TMS Services
The structure uses the matrix and starting coordinates / starting tiles [server]/0/0/0.png. When not defined, the starting point 0/0 is from bottom left. The starting point can be also defined inside gridOrigin element. The negative numbers in tiles numbering are allowed.
For gridOrigin you can choose any coordinate, based on your project range from model.xml, where the 0/0/0.png tile will start.
The final TMS structure is available under the address: http://[lids-as]/TileMapService/[tms_layer]/0/0/0.png
List of TMS layers can be found in LIDS AS console, under Browser & Map services tab.
Request for TMS Services: not defined yet.
WMTS Services
WMTS is OGC standard to serve tiles (the same tiles as TMS). WMTS contexts are defined using refId's from TMS Layers.
<ber:wmts>
    <ber:contexts>
      <ber:context id="">
        <ber:layer refId="tms_water"/>
        <ber:layer refId="tms_electricity"/>
        <ber:layer refId="tms_telco"/>
        ...
Request for WMTS Services:
http://[lids-as]/WMTS?service=WMTS&version=1.0.0&request=GetCapabilities
There are few differences between TMS and WMTS. Precise specifications can be found at:
- http://wiki.osgeo.org/wiki/Tile_Map_Service_Specification
- http://www.opengeospatial.org/standards/wmts
Security
All services used and shared with LIDS AS and defined in map-service.xml are under LIDS Security. It means the services are available with basic authentication for allowed users.
When accessing WMS service, access rights to data and to template settings are evaluated. Different users might get different results when accessing the same WMS service.
In case of WMTS / TMS services, the access rights to data are not evaluated, so all users get the same results.